Concept
My wife, Nichole, and I bought an RV in 2020. I’ve had a lifelong love of model trains, and Nichole has come to like them, too. We wanted to make some kind of train layout that would be small and portable enough to take with us when we use the RV.
I immediately thought of the dinette table. When we’re not eating, a small layout could sit on top of it. Keeping the layout on the existing table would eliminate the need for the layout to have legs. It could be lifted up to the bunk area above the cab when it’s not being used.
Out of necessity, the plan needs to be small. The dinette table measures 29 inches wide and 42 inches long. Initially, I made those my measurements for the layout.
I chose N as the scale because it suits the small size of the layout. I have a lot of N scale equipment already, as well as a bunch of structures and structure kits that have been languishing in boxes for years. I also thought that working in some Nn3, N scale narrow gauge (using Z scale mechanisms and wheels), would be great for a tiny layout like this.
Since Nichole and I both like the ocean, I thought a fictitious coastal town “somewhere in California” would be the perfect setting. Picture a sleepy little town built on an inlet that has a small harbor, set sometime during or before the 1950s.
Two railroads meet here, a standard gauge line and a narrow gauge line. They share a freight house so that loads can be transferred from one railroad to the other.
Trains are typically short, and small steam locomotives are the order of the day. The town has an industry or two where freight cars can be delivered, and a small depot shared by both railroads for passengers.
Design Specs
Even thought it’s going to be small, I still wanted to design something that would be fun to operate, not just running trains around in circles (though all the plans here can do that, too).
Operating in this case mostly means switching, setting out or picking up cars from industrial or yard tracks. A depot would give passenger trains somewhere to stop. A passing siding even opens up the possibility of having a meet, where one train takes the siding to wait for another to pass.
All of the plans on this page share several design specs in common:
- Single location – the layout represents a single town. It’s really too small to credibly represent multiple locations.
- No grades – though the scenery may have some hills and low spots, the track itself is pancake flat. Having all the track at the same level will simplify construction.
- Loop design – a loop gives the option for continuous running, when you just want to chill and watch trains go by.
- Harbor – a small harbor divides the layout into two distinct halves.
- Town and country – most of the track is on the right side in these plans. The left is more open for scenery. I envision that the right side will be on the aisle in the RV when the layout is in use.
- Operation – each plan has some spur tracks and a runaround track so that cars can be switched.
- Scenery – each plan has enough open space for scenic elements.
- Handlaid, dual gauge track – I am going to attempt to hand lay N and Nn3 dual and single gauge track. This is going to take some work, but this kind of track is also very fluid, allowing me to do things that I just couldn’t do with commercial track. Also, I’m not aware of any commercially available N scale dual gauge track.
- Curves – 11 inch minimum mainline radius for the standard gauge, 8 inch for the narrow gauge.
- Photography – if built right, the layout should lend itself to taking a lot of neat model photos.
It’s worth mentioning that any of these plans could be built with a single gauge, like regular N scale, and they would still work. Some of the curve radii might need to be adjusted. If you wanted to build one of these plans in HO scale, you’d need to double the dimensions.
Let’s take a look at some plans to see how the concept evolved.
Colors
All of the plans on this page have the same color coding. Tracks drawn in black are dual gauge. Blue tracks are narrow gauge only, and orange tracks are standard gauge only.
The light blue boxes in the legend represent freight cars. The standard gauge cars are bigger, representing cars a scale 40′ long. The narrow gauge cars are about 30′
I used these on some of the plans to get an idea about the capacity of the spur tracks.
The little numbers next to the tracks at some points on the plans are curve radii in inches.

Quick Links
- Plan No. 1
- Plan No. 2
- Plan No. 3
- Plan No. 4
- Plan No. 5
- Plan No. 6
- Plan No. 7
- Plan No. 8
- Plan No. 9
- Plan No. 10
- Plan No. 11
- Plan No. 12
- Plan No. 13
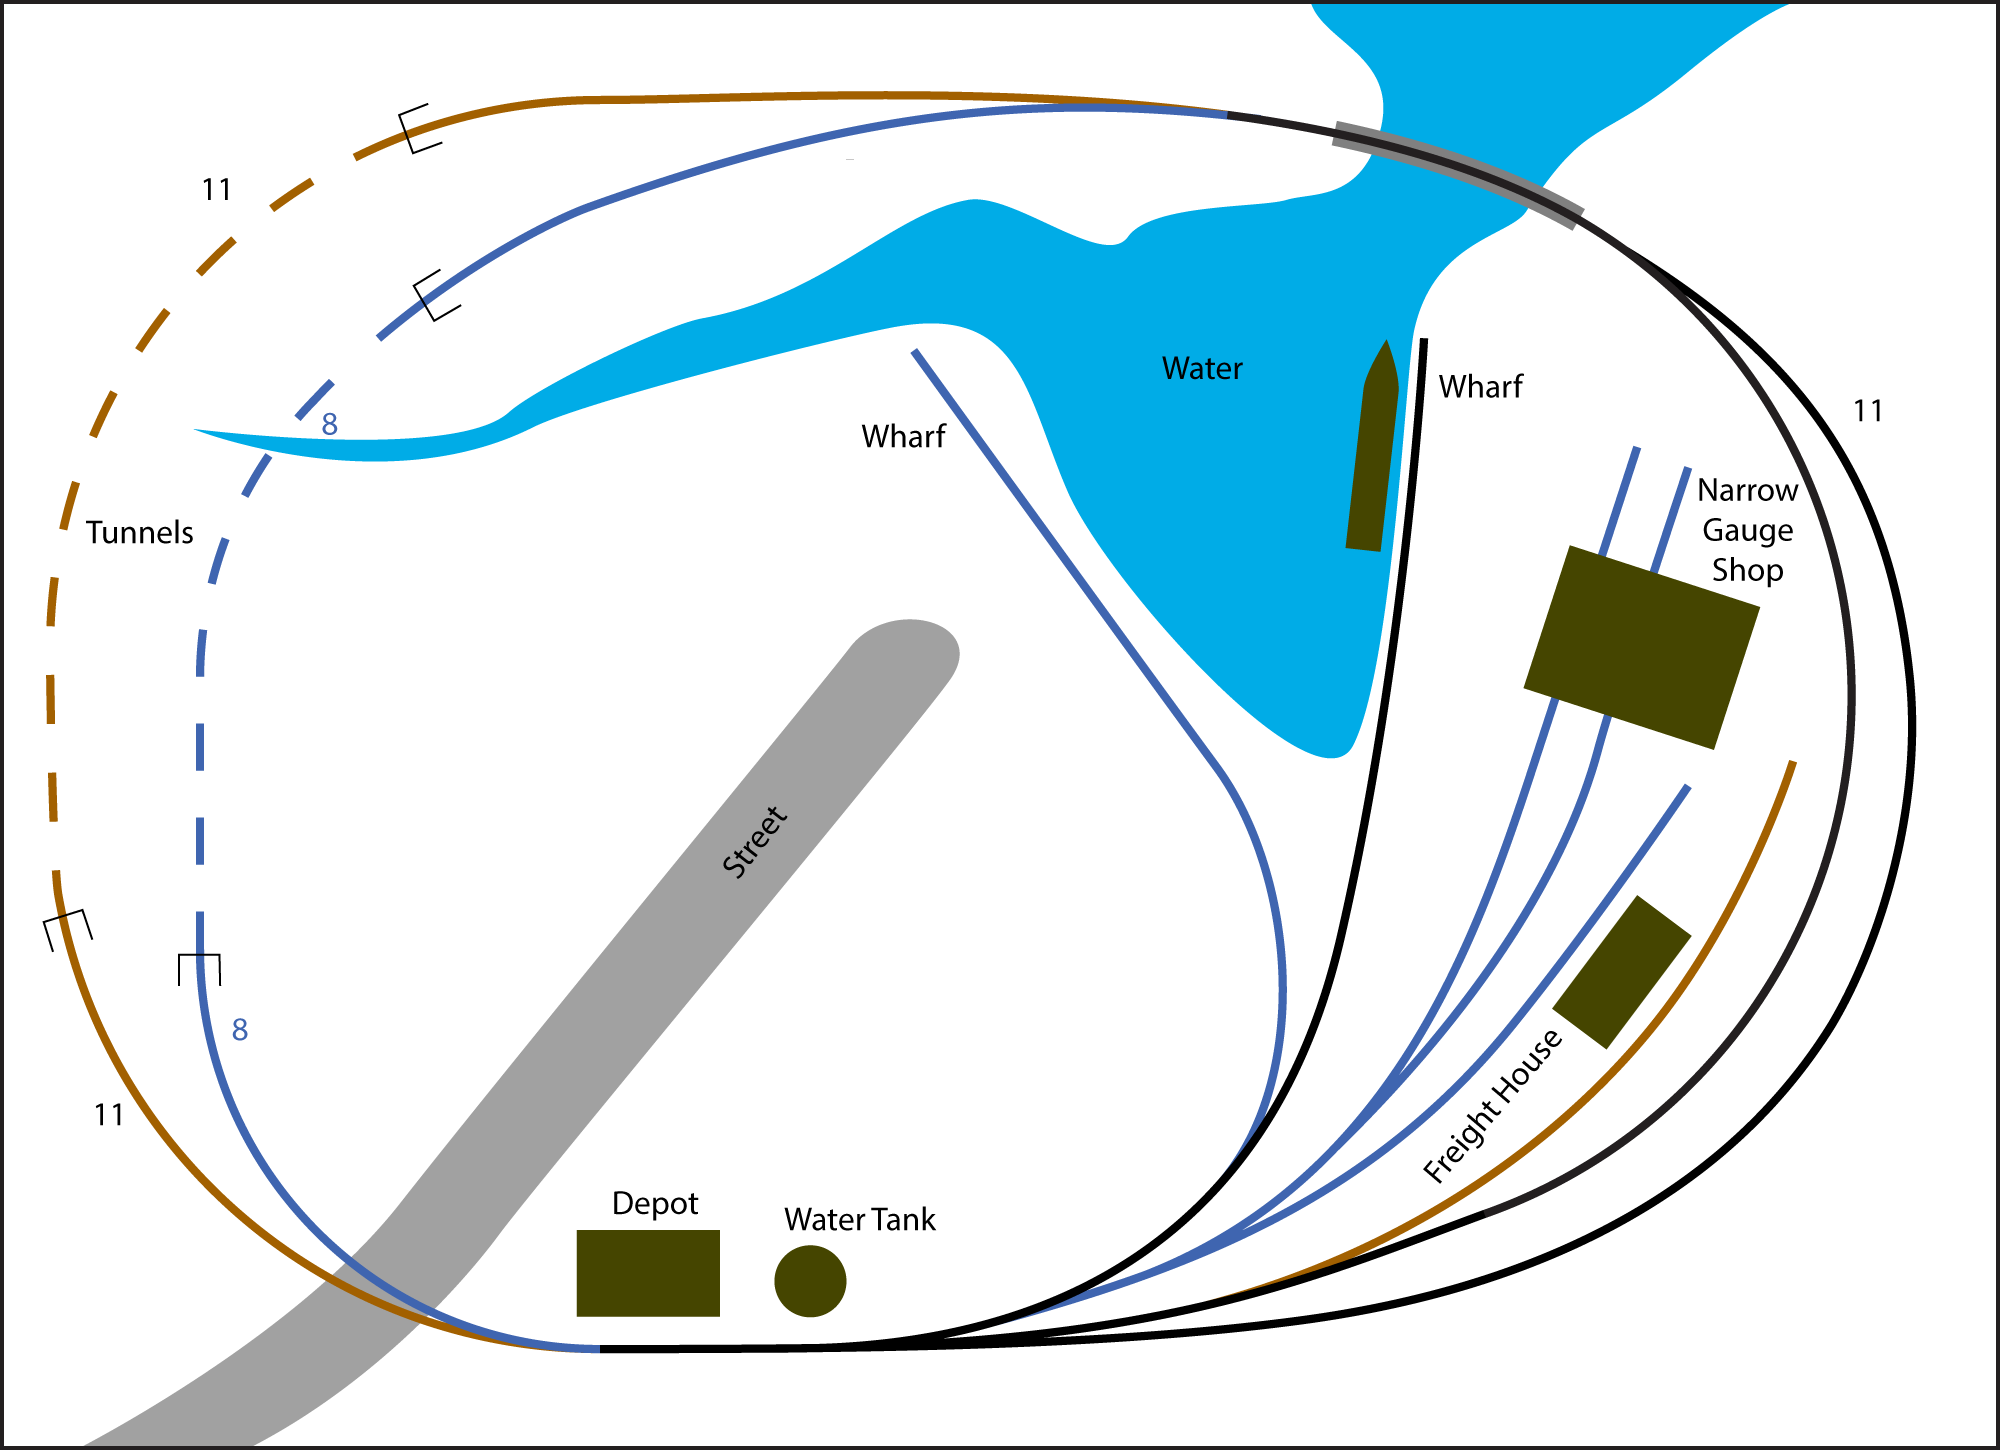
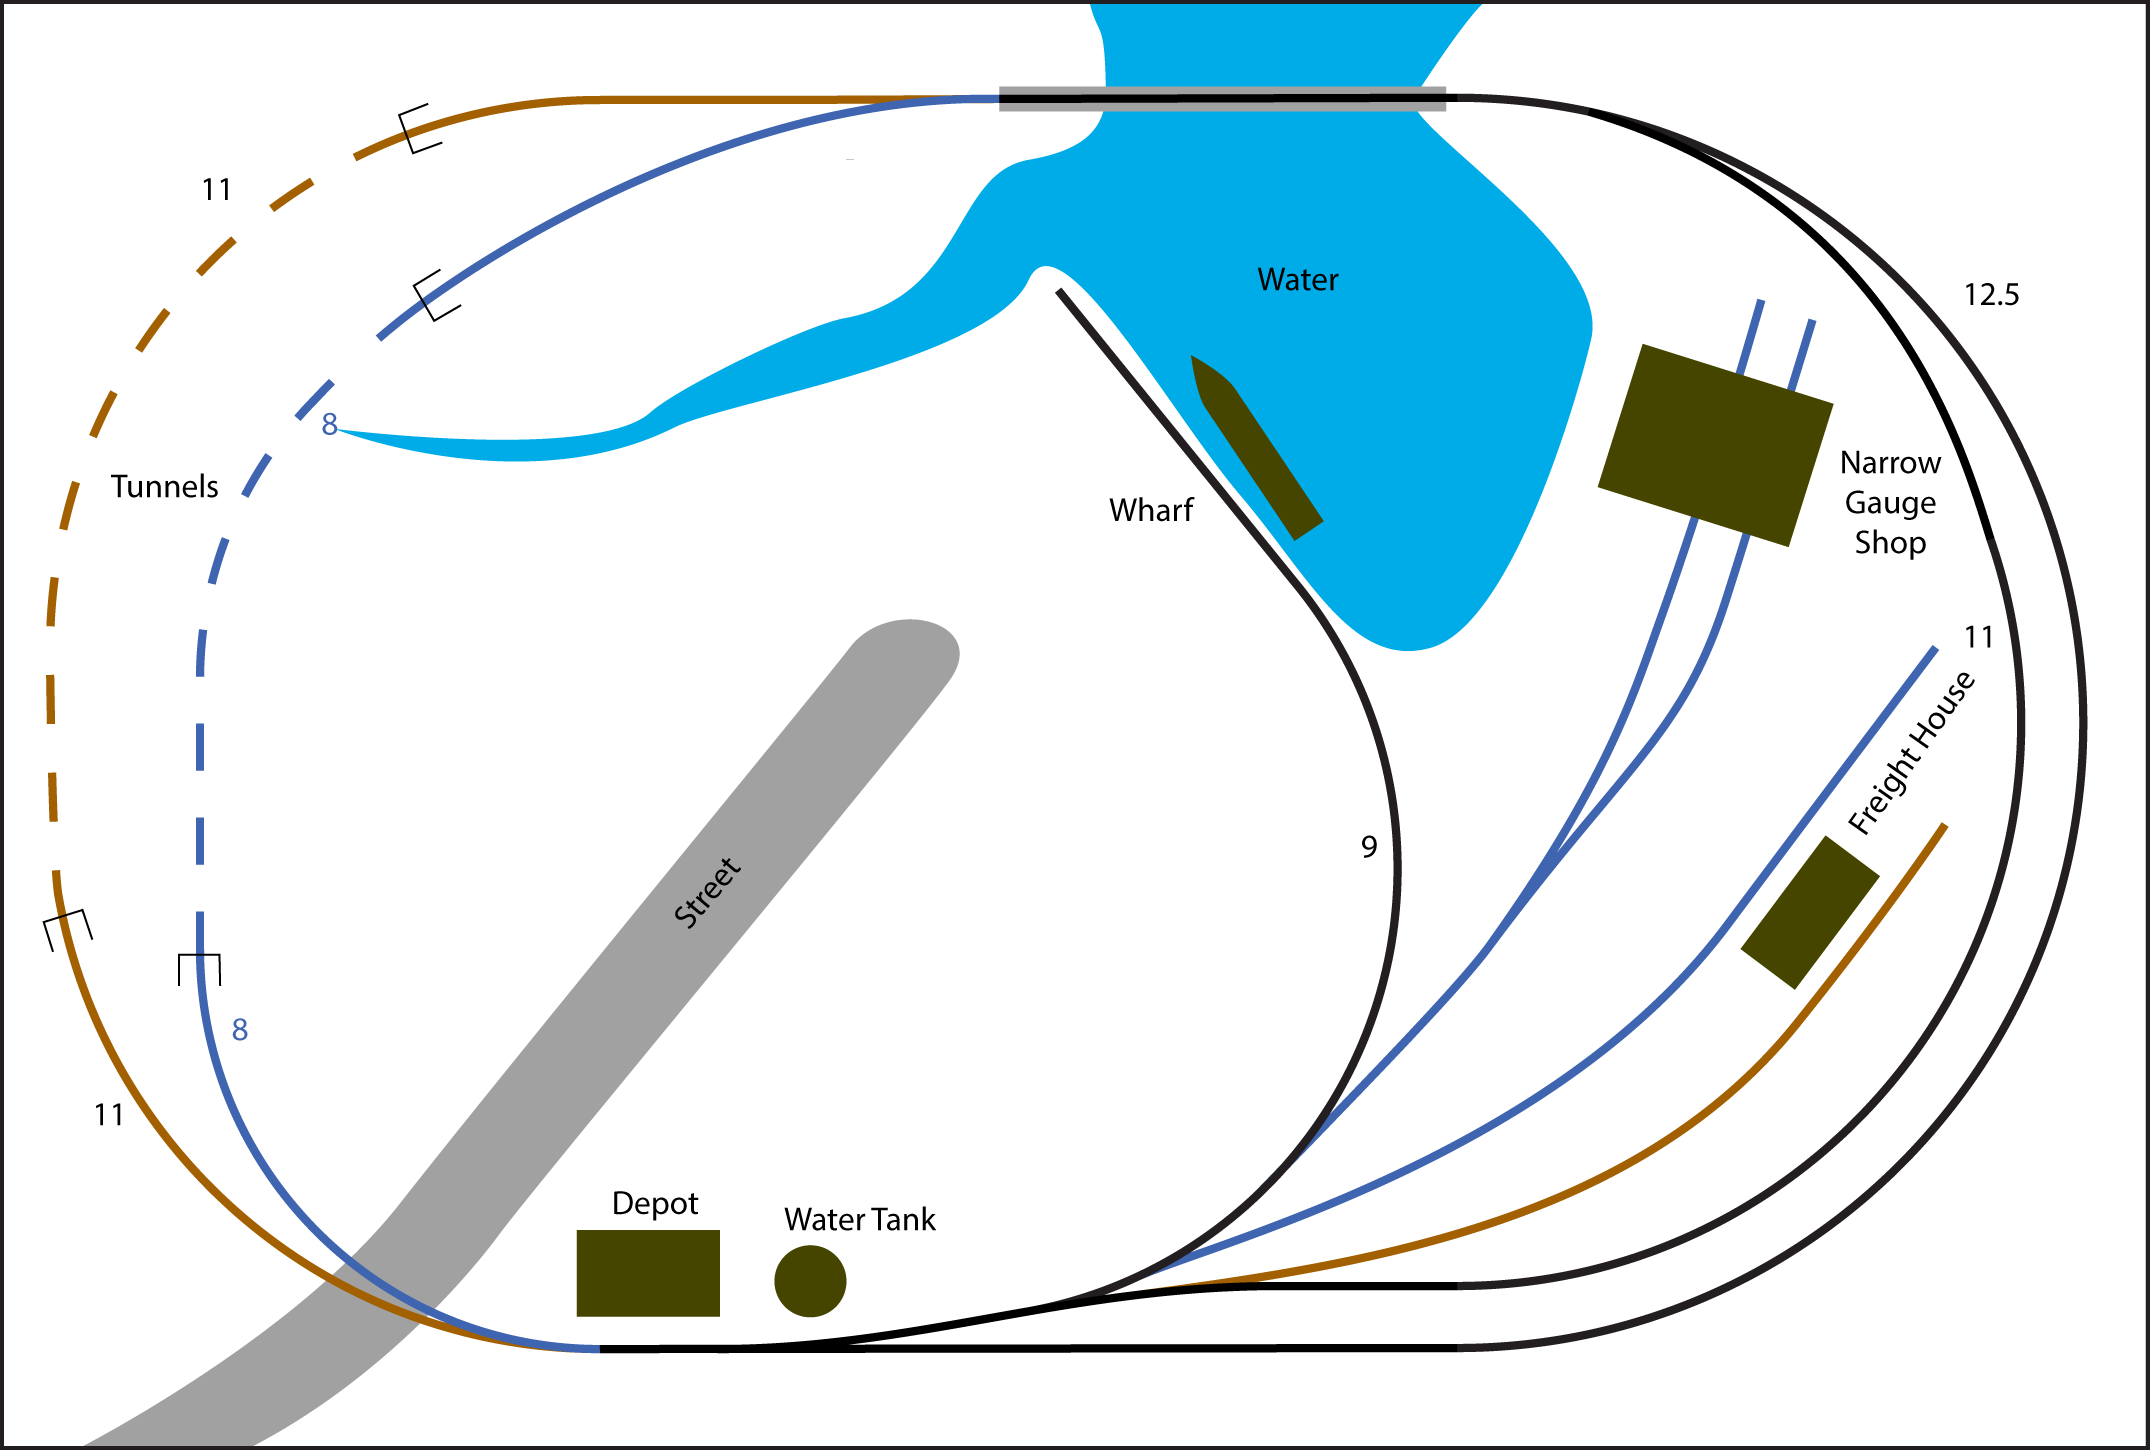
Plan No. 1
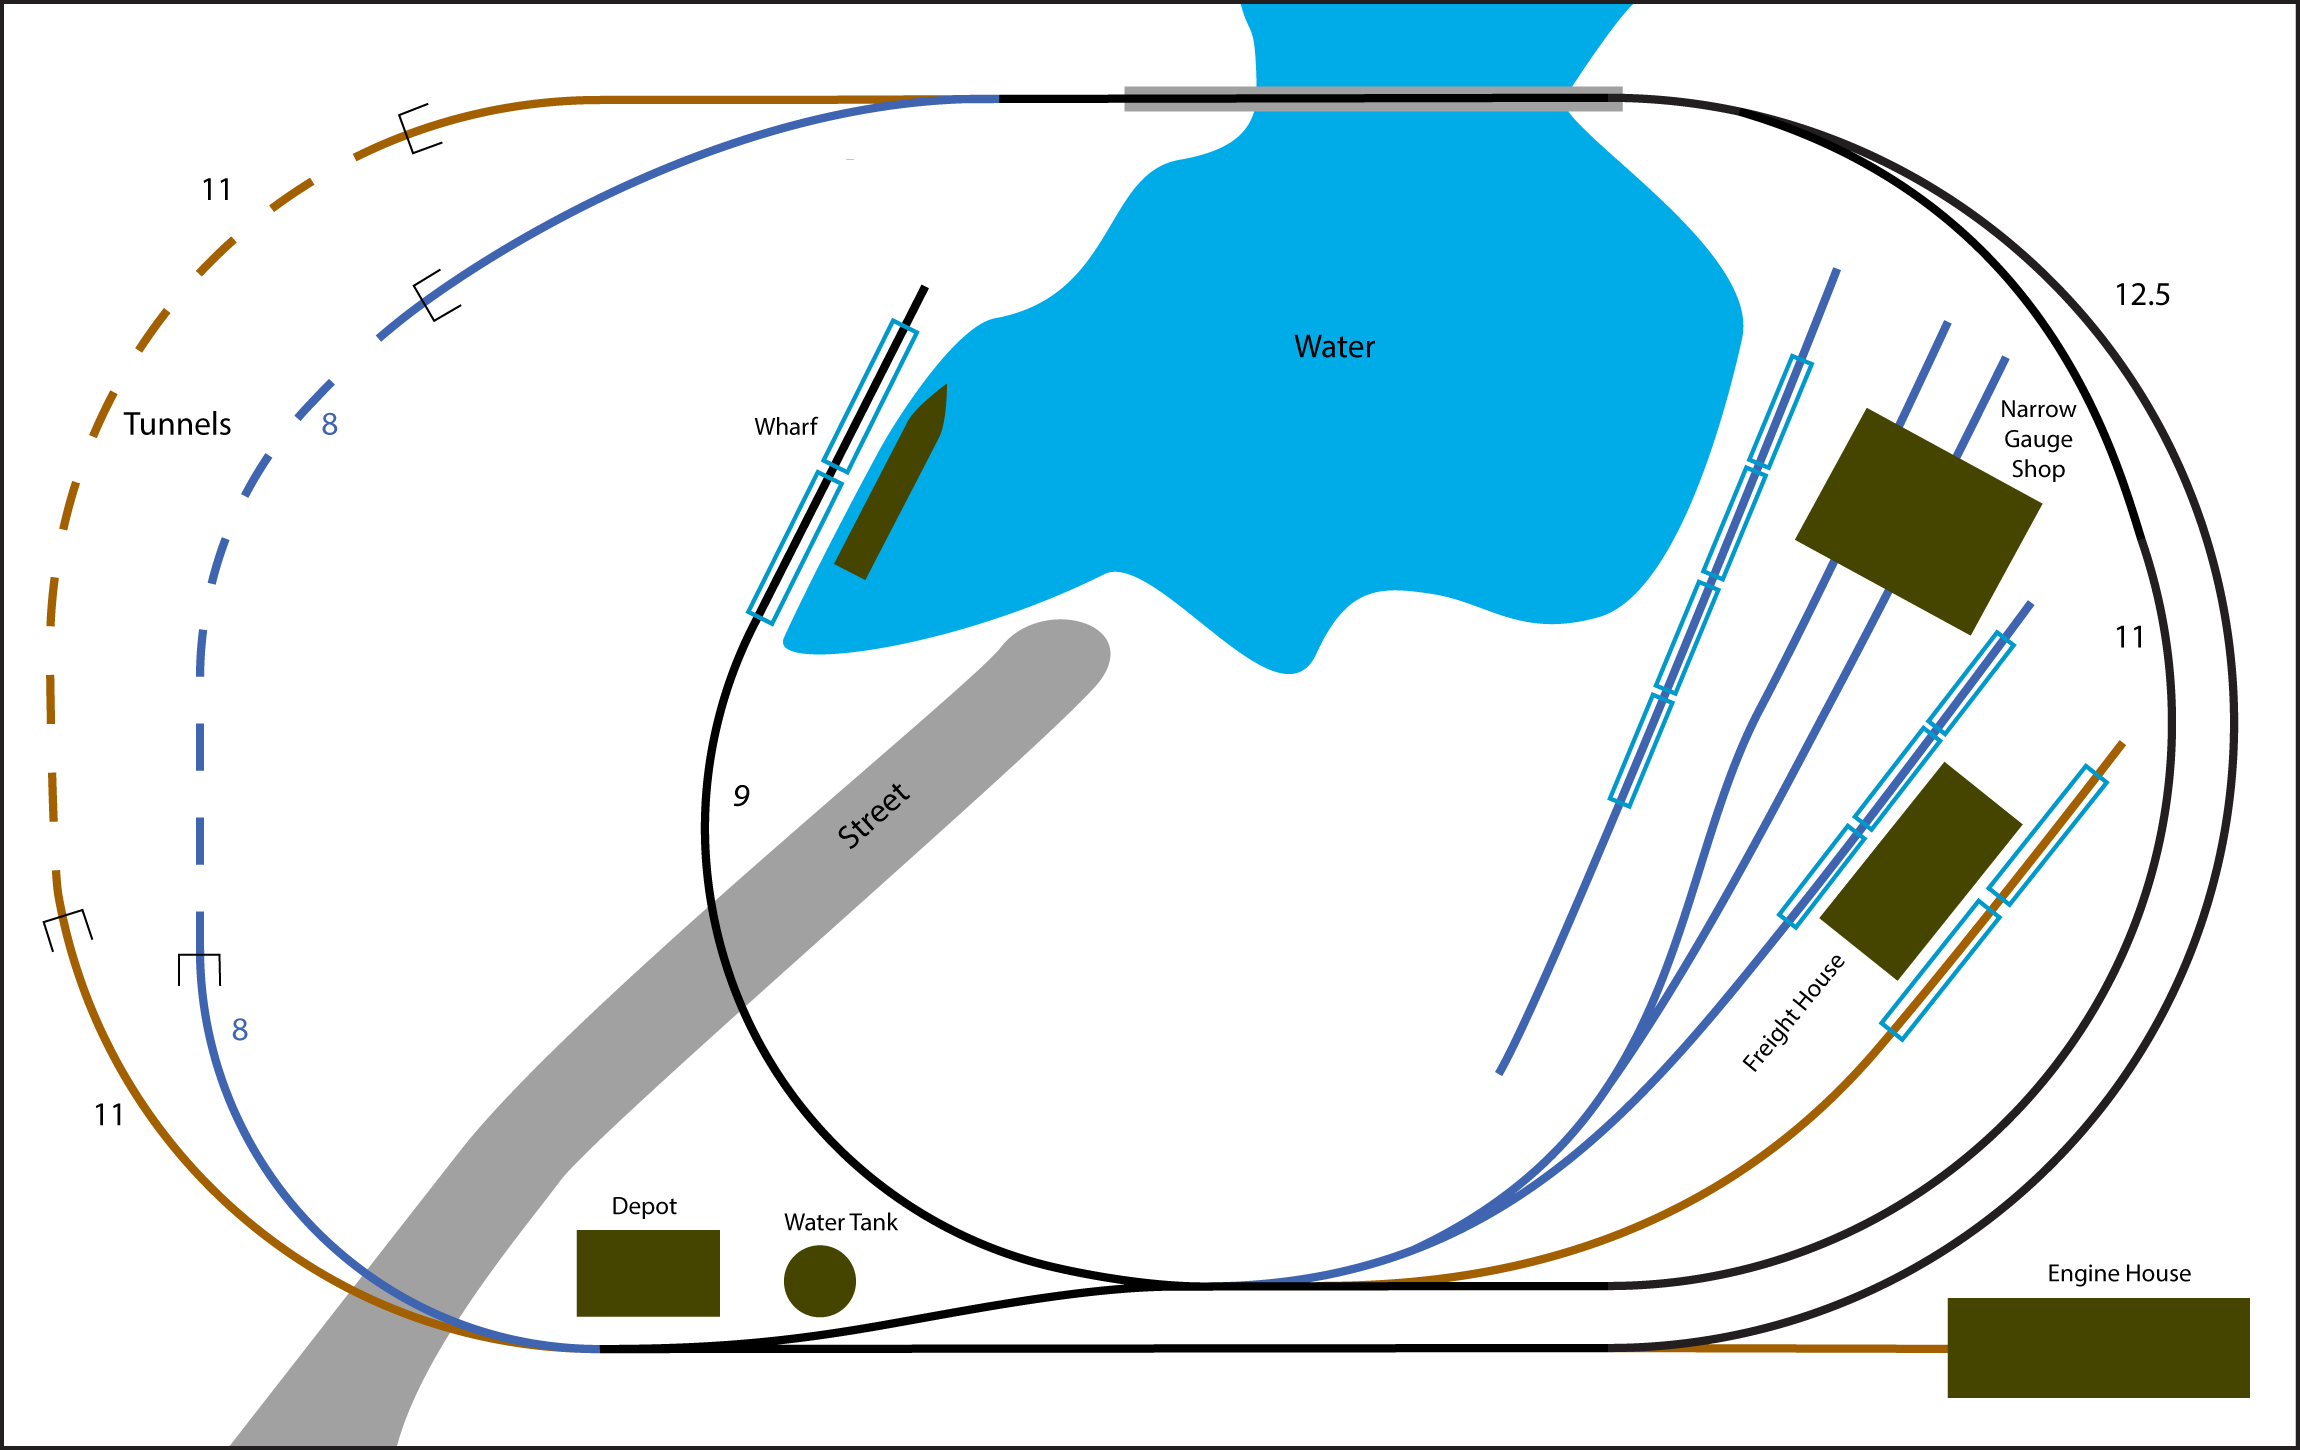
This was my first stab at a plan for the RV layout. Even though this isn’t what I settled on, I think this is a nice, workable plan. I like it for its simplicity, and because it has plenty of room for scenic elements.
This plan has continuous running, and a passing siding for meets. A pair of spurs give it some possibilities for switching, and because it’s not crammed full of track, there is room for scenery and structures.
The tunnels are short, but could provide a staging spot for one short train in each.
I picture the left side with the tunnels as being hilly, and the right side is mostly flat. The water in the middle provides some visual separation and helps establish a sense of going somewhere even though the layout is tiny.
The tracks are set back a little from the edge of the layout, giving some foreground for photography. The wharf could also be very photogenic, and there is room for a small town on the left side of the harbor.
Construction for this one would also be fairly simple. There are only four dual-gauge turnouts, plus two pieces of trackwork where the dual gauge separates into two tracks (these are kind of like a turnout, but don’t need moving parts). The narrow gauge trains always go through one way and the standard gauge trains go through the other.

Plan No. 2
This plan is an evolution of the first. I was attempting to add another spur, and make it interesting by also having a crossing.
The curve radius of the new spur is questionable, though. It might be too tight near the turnout for good operation.
Also, having a spur track invade the town area cuts down on the scenic space.
I don’t really like this plan, but it was a stepping stone in the evolution of the RV layout.

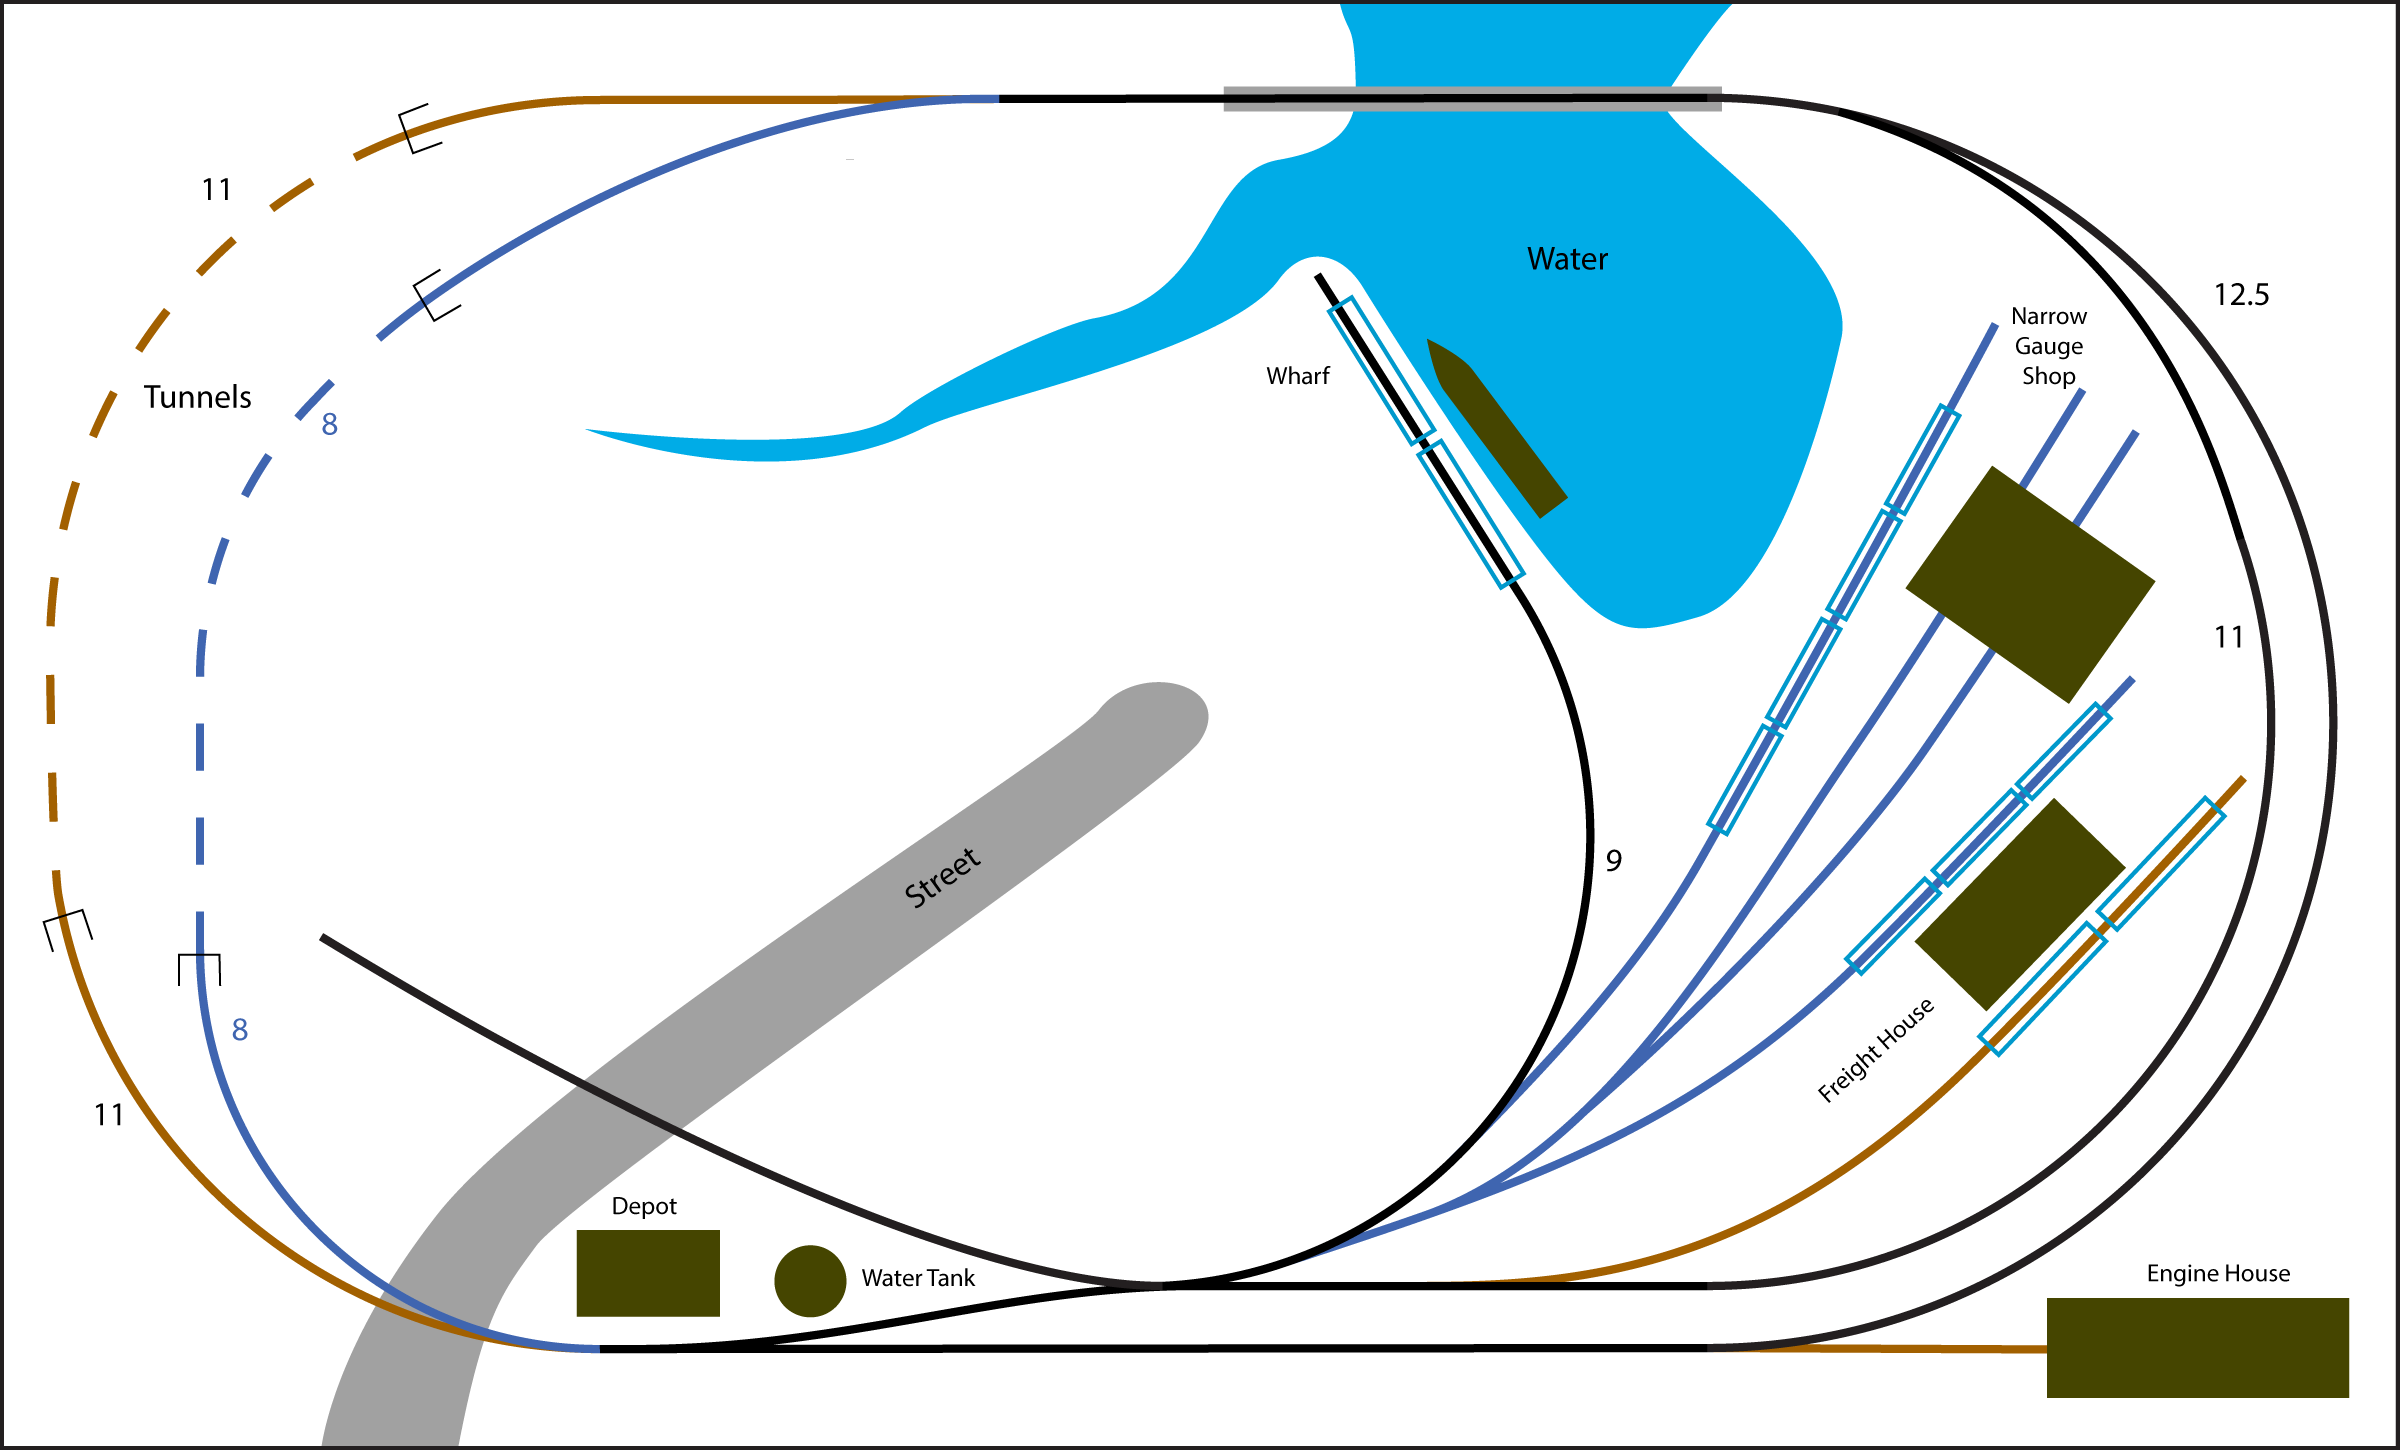
Plan No. 3
This plan was my first major redesign. I expanded the size of the loop by pushing the tracks a little closer to the edge.
There’s also a lot more track on the right side. The left side is still open for scenery.
I added a street, so that I could model a grade crossing. I moved the depot closer to the street, since in my mind that side was evolving as the “downtown” area.
Also, I wanted to make room for some more interesting operation as well as use some N scale structure kits that I’ve had since I was a kid.
The building footprints are drawn more or less to scale. The Narrow Gauge shop is a Tuolumne Train Repair Shed kit from Muir Models. The freight house is an old Bachmann or AHM structure.
With the freight house, this plan introduces a place where loads can be transferred from narrow gauge cars to standard gauge cars and vice versa. Narrow gauge and standard gauge railroads can’t exchange whole cars like railroads built to the same gauge would, so loads need to be transferred by some other means. I picture workers with hand trucks moving crates through the freight house from one boxcar to another.
The narrow gauge shop could be used as a car shop or an engine house, or both. Spur tracks to wharves on both sides of the narrow harbor provide more places to spot cars for switching.
I like this plan in concept, but it’s still not quite there for me. The yard with the freight house and shop tracks is a little too curvy. Coupling and uncoupling N scale model trains on curves doesn’t always go so well.
Also, the harbor seems really narrow. Could they even turn that boat around in there?
I do like the idea of a small stream coming into the harbor from the left, as that could make for some neat scenery.
Plan No. 4
This plan is a more evolved version of plan 3. Once again, I rearranged the mainline slightly.
All of the plans so far have featured a drawbridge over the water, but this was the first plan I did where the bridge is drawn to represent a specific model. I found an old used drawbridge model on eBay.
The bridge model is straight, not curved, so I needed to move the bridge and harbor mouth to an area where the track could be straight. I also drew the bridge to scale.
Rearranging the mainline also allowed me to make the yard tracks a little straighter. There’s even a single yard track next to the shop for car storage.
I liked this plan a lot, and for a while I was thinking this might be the one. It’s good to sit on things like this for a while, though.
I don’t like that there is only one standard gauge car spot on this plan, by the freight house.
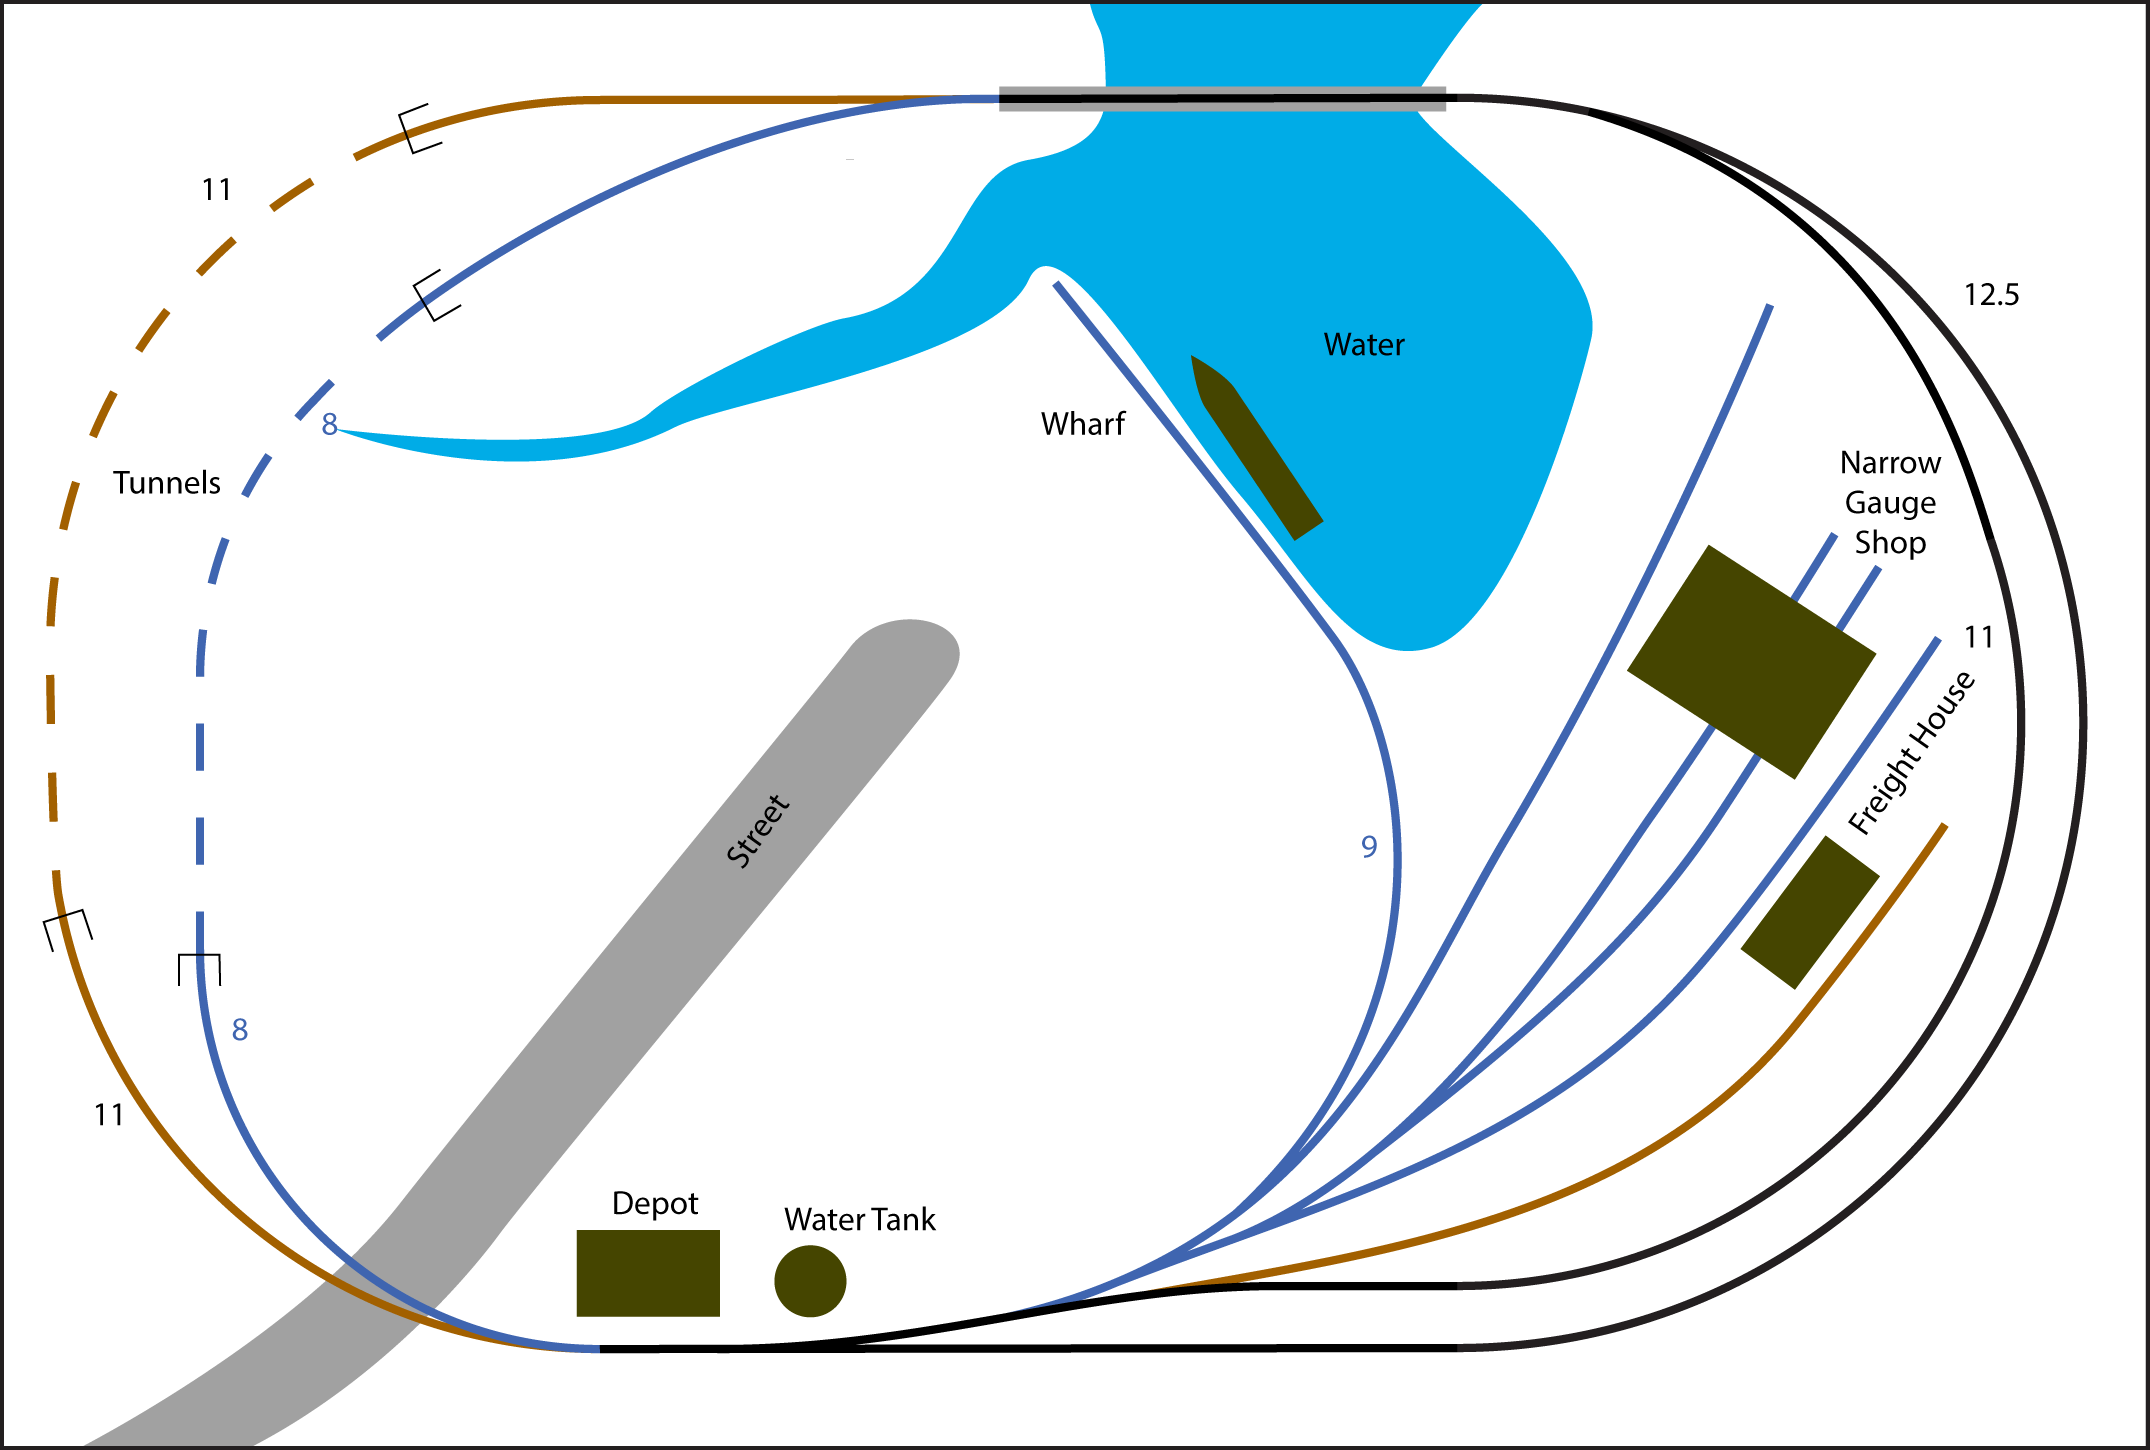
Plan No. 5
This plan is the same as plan 4 except for the arrangement of the yard tracks.
The wharf track is now dual gauge, giving another place to spot standard gauge cars, which was one of the things that bugged me about plan 4.
Doing this would put the standard gauge on a 9 inch radius curve to reach the wharf, which is a little tight even for N scale. I had to do some testing on my workbench to see if my small N scale steam locomotives could handle it. Most of them could negotiate the 8 1/2 inch radius curve I used for testing, so I figured a 9 inch radius should be okay.
I also changed the location of the freight house.
I don’t think this plan makes very good use of the space on the right side of the layout, and this isn’t something I would build, but it’s good to try things. Finding out what doesn’t work is just as important as finding out what does.
Plan No. 6
This is another variation of the same idea as plan 4 and 5, and one that didn’t work. In fact, I didn’t even try to finish it.
I was playing with different locations for the freight house. This one would complicate the trackwork a lot, with two crossings, and there is really no good place to tie in the narrow gauge yard track.
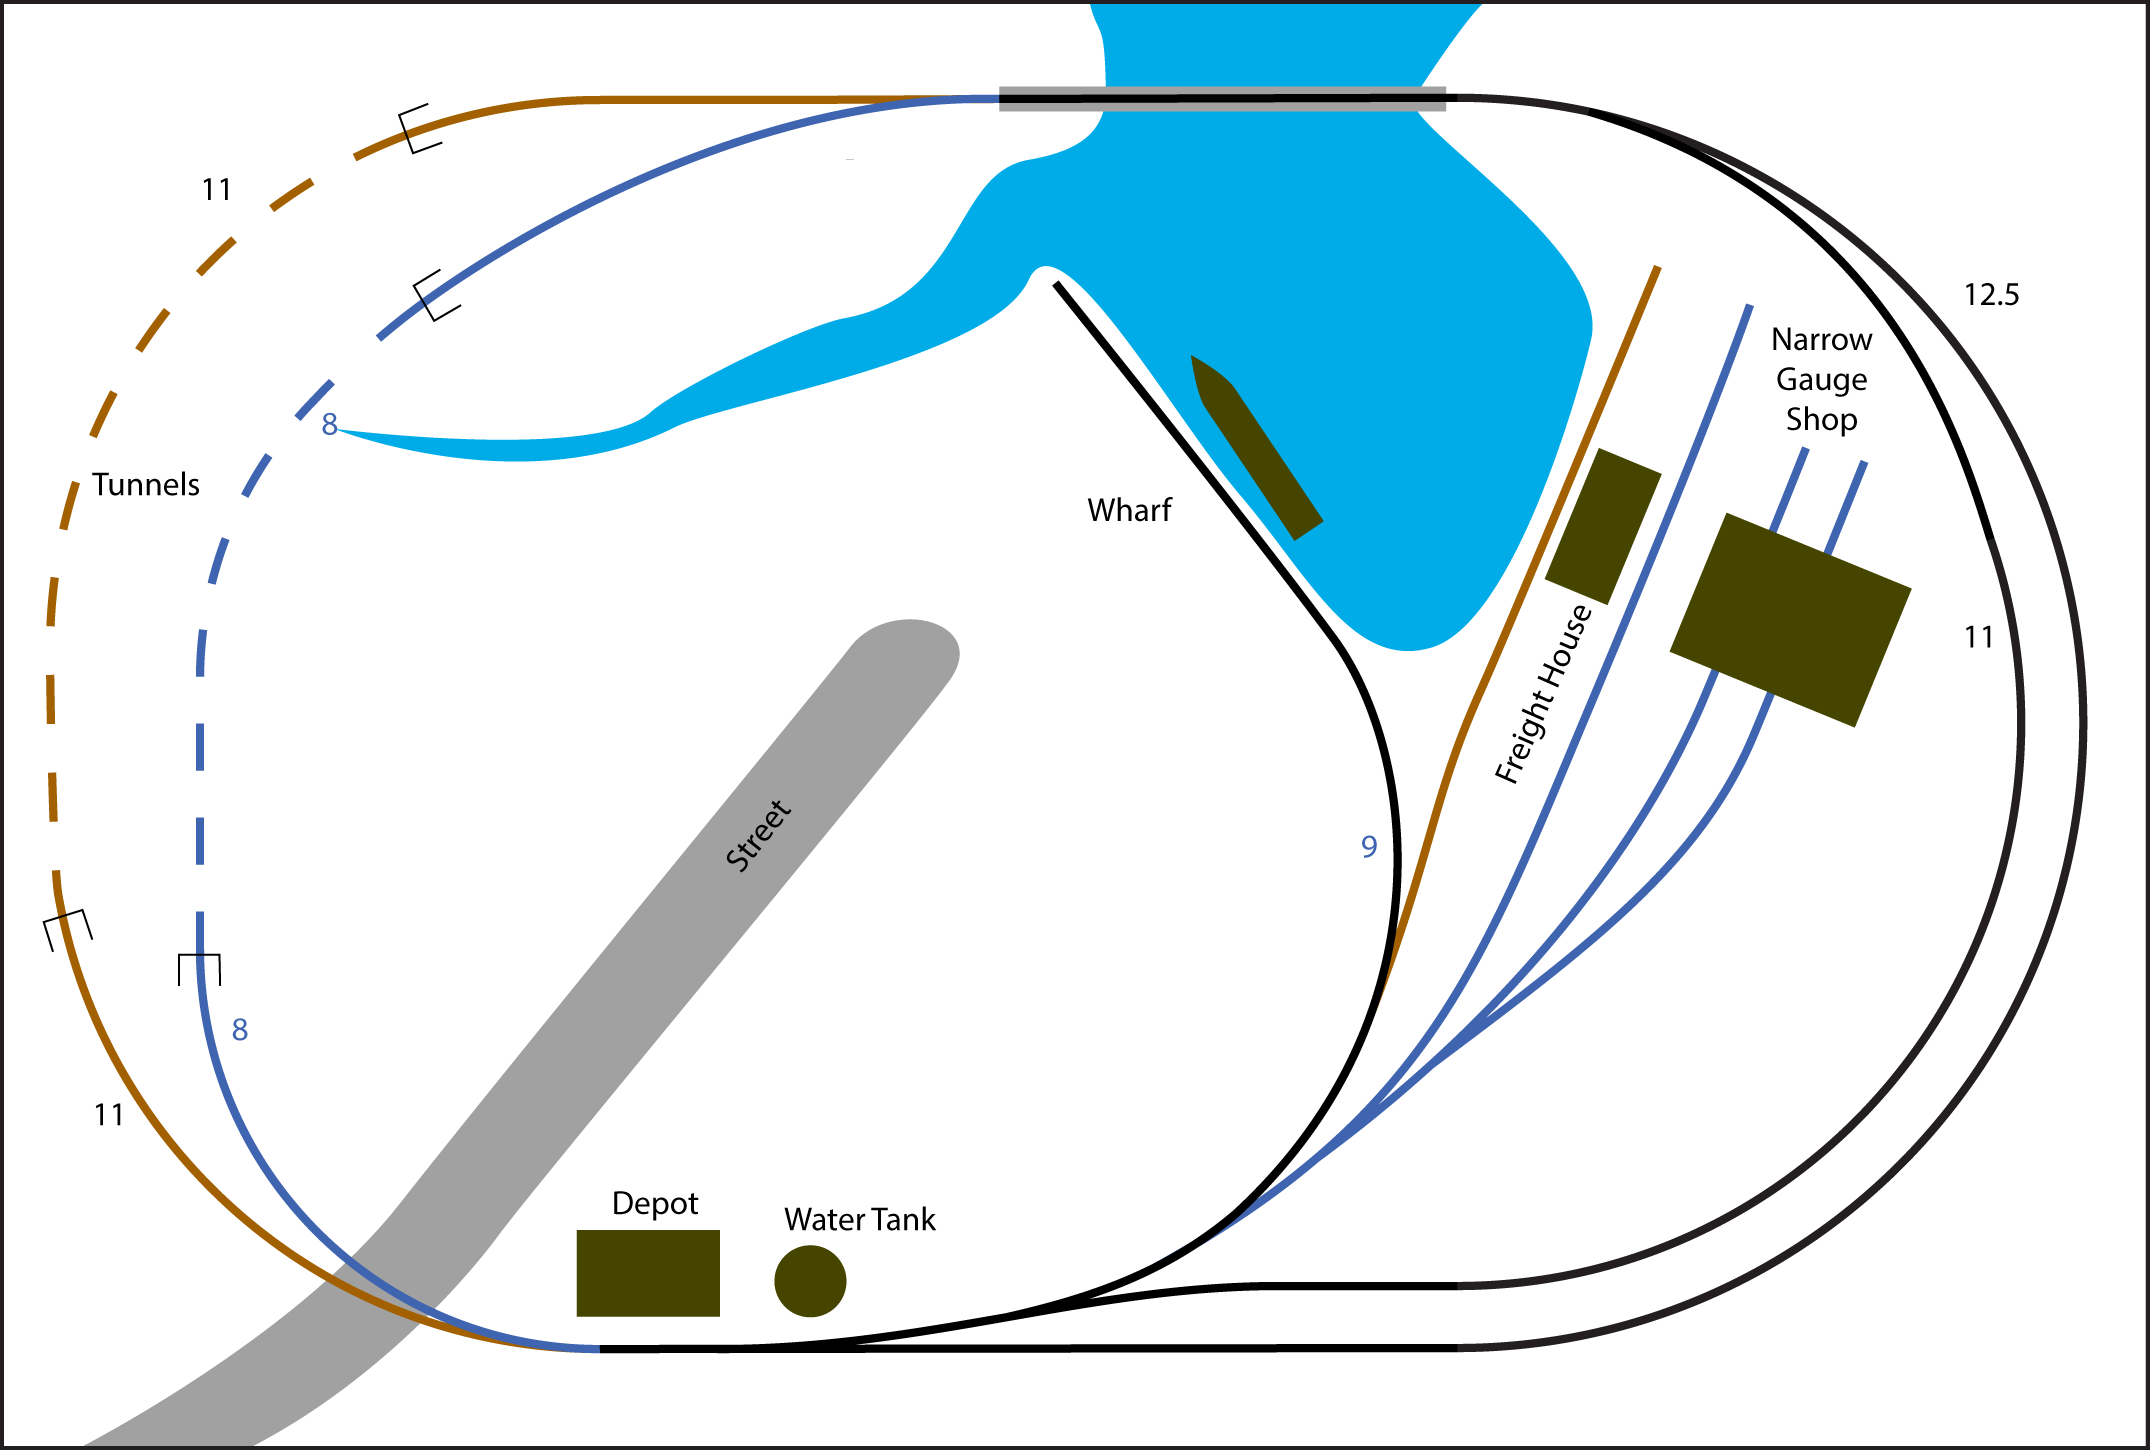
Plan No. 7
This one puts things back closer to the way they were in plan 4. The wharf spur is still dual gauge.
This plan is workable, but as with plan 5 I don’t think it makes very good use of the space on the right side.
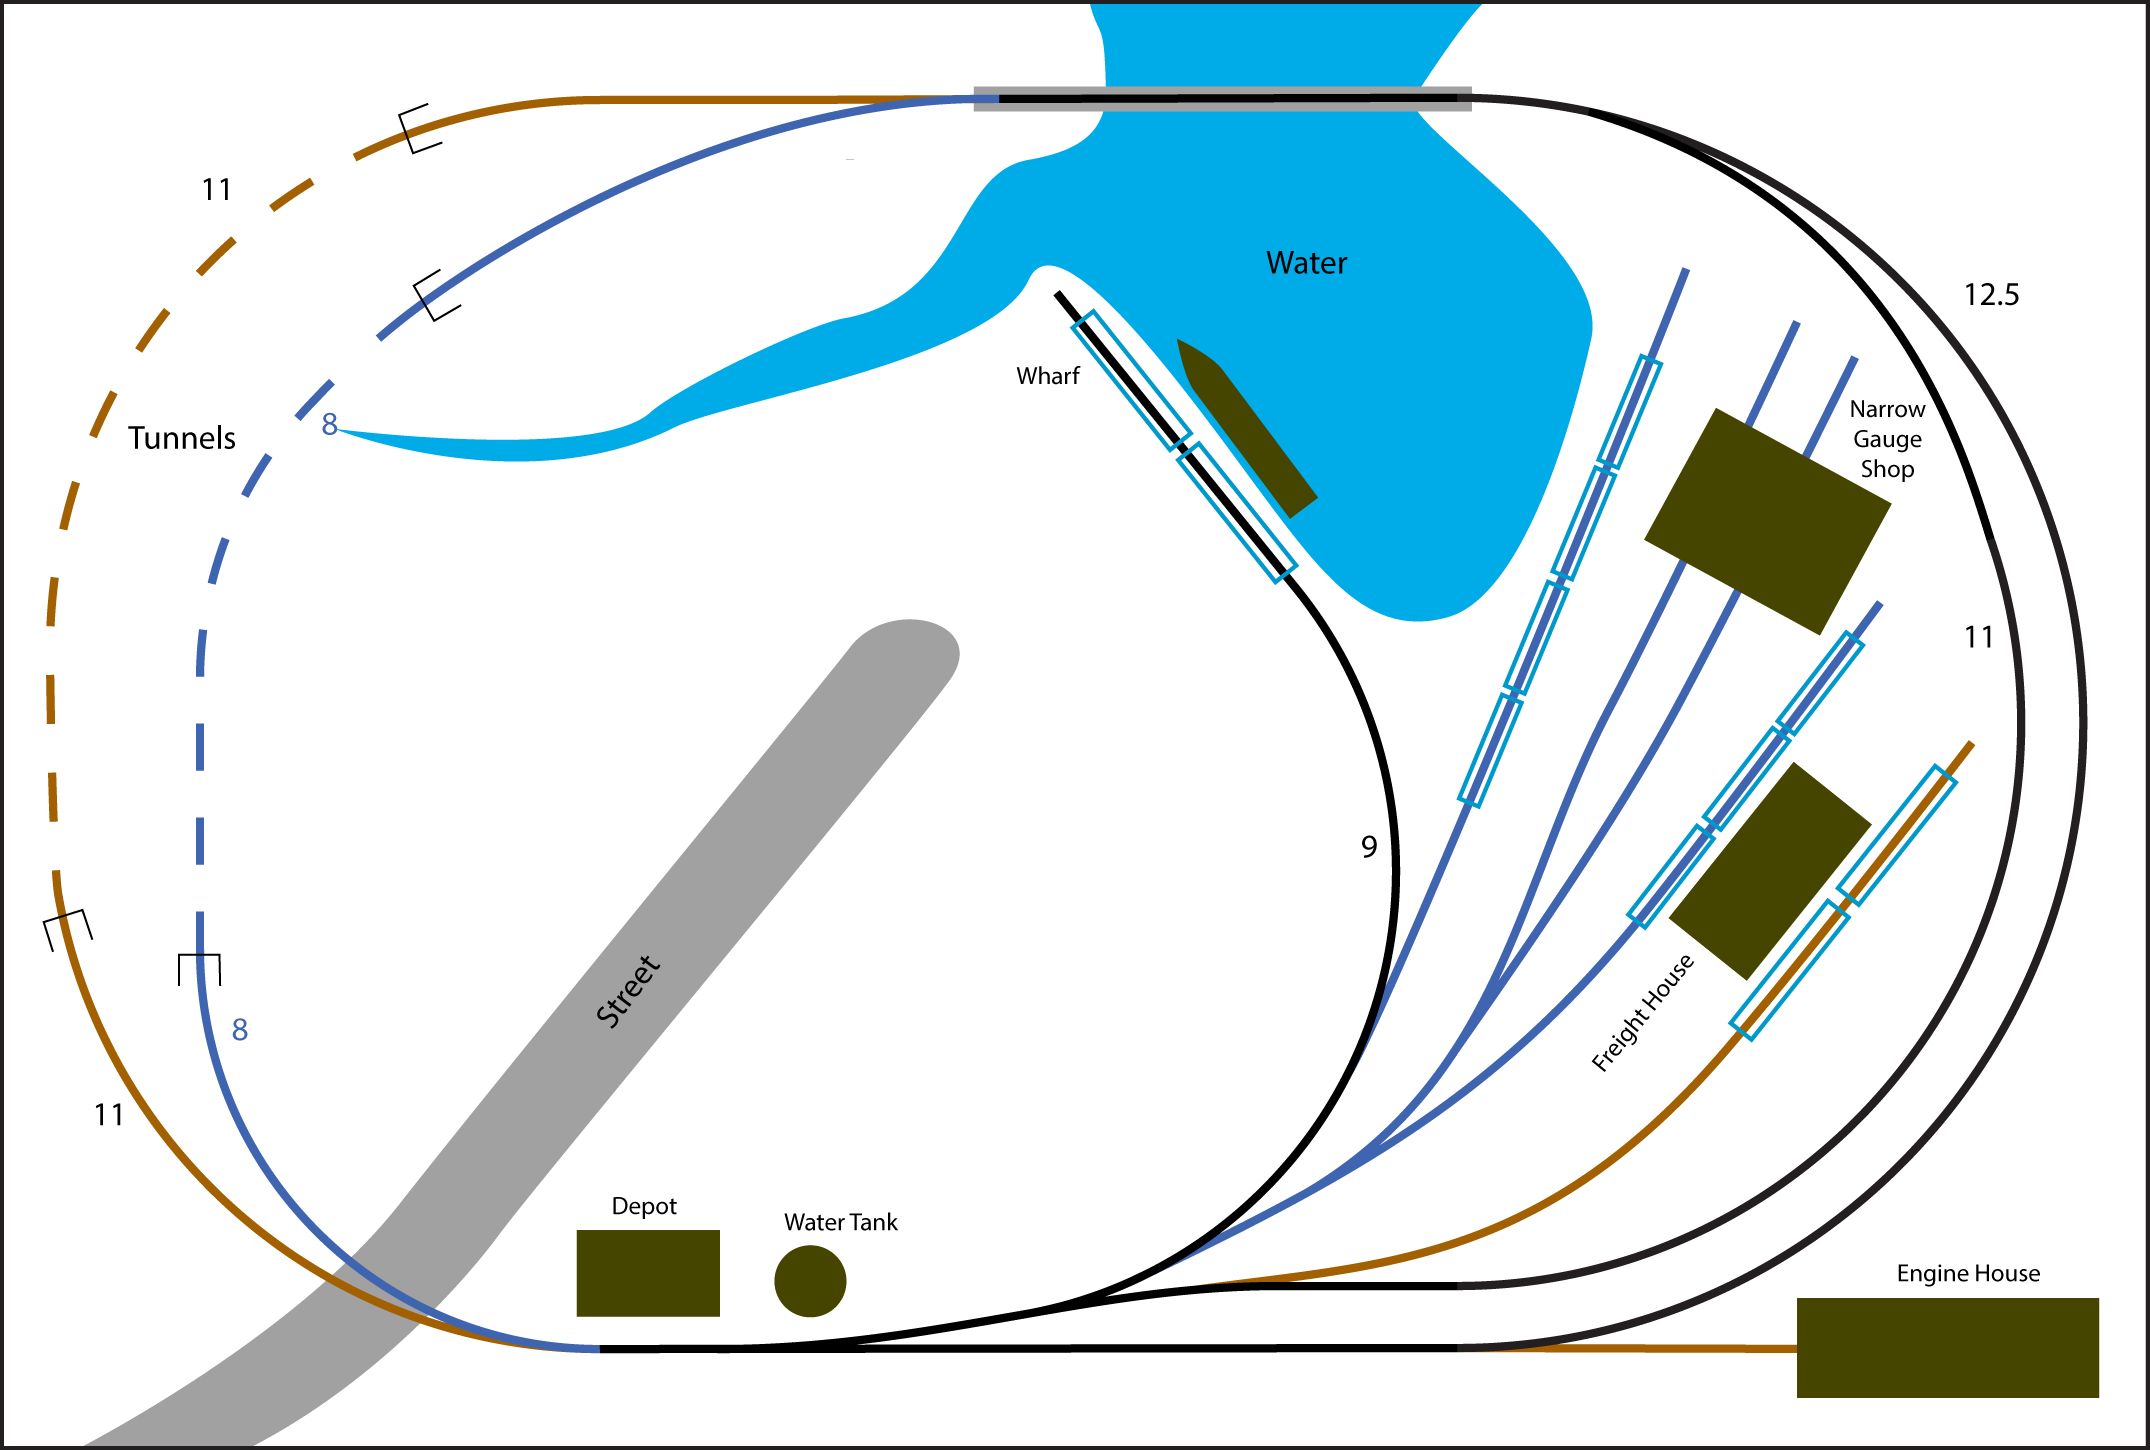
Plan No. 8
While working up the plans for the RV layout, a very generous person from my YouTube channel audience donated some items for the project.
In addition to some rolling stock, he gave us three structure kits. One of those was for a single stall engine house. I wanted to find a space for that.
I decided the engine house would be for the standard gauge, and I put it in the lower right corner.
The rest of the trackage is much the same as it was in plan 4.
On this plan I started to add the blue outlines of typical boxcars to get some idea how many cars would fit on the spur tracks. I only put cars on the straight sections, since coupling and uncoupling on curves can be problematic.
This is a good, workable, plan and one that I considered building. There’s enough track to provide interesting operation, and the left side still has plenty of space for scenery.
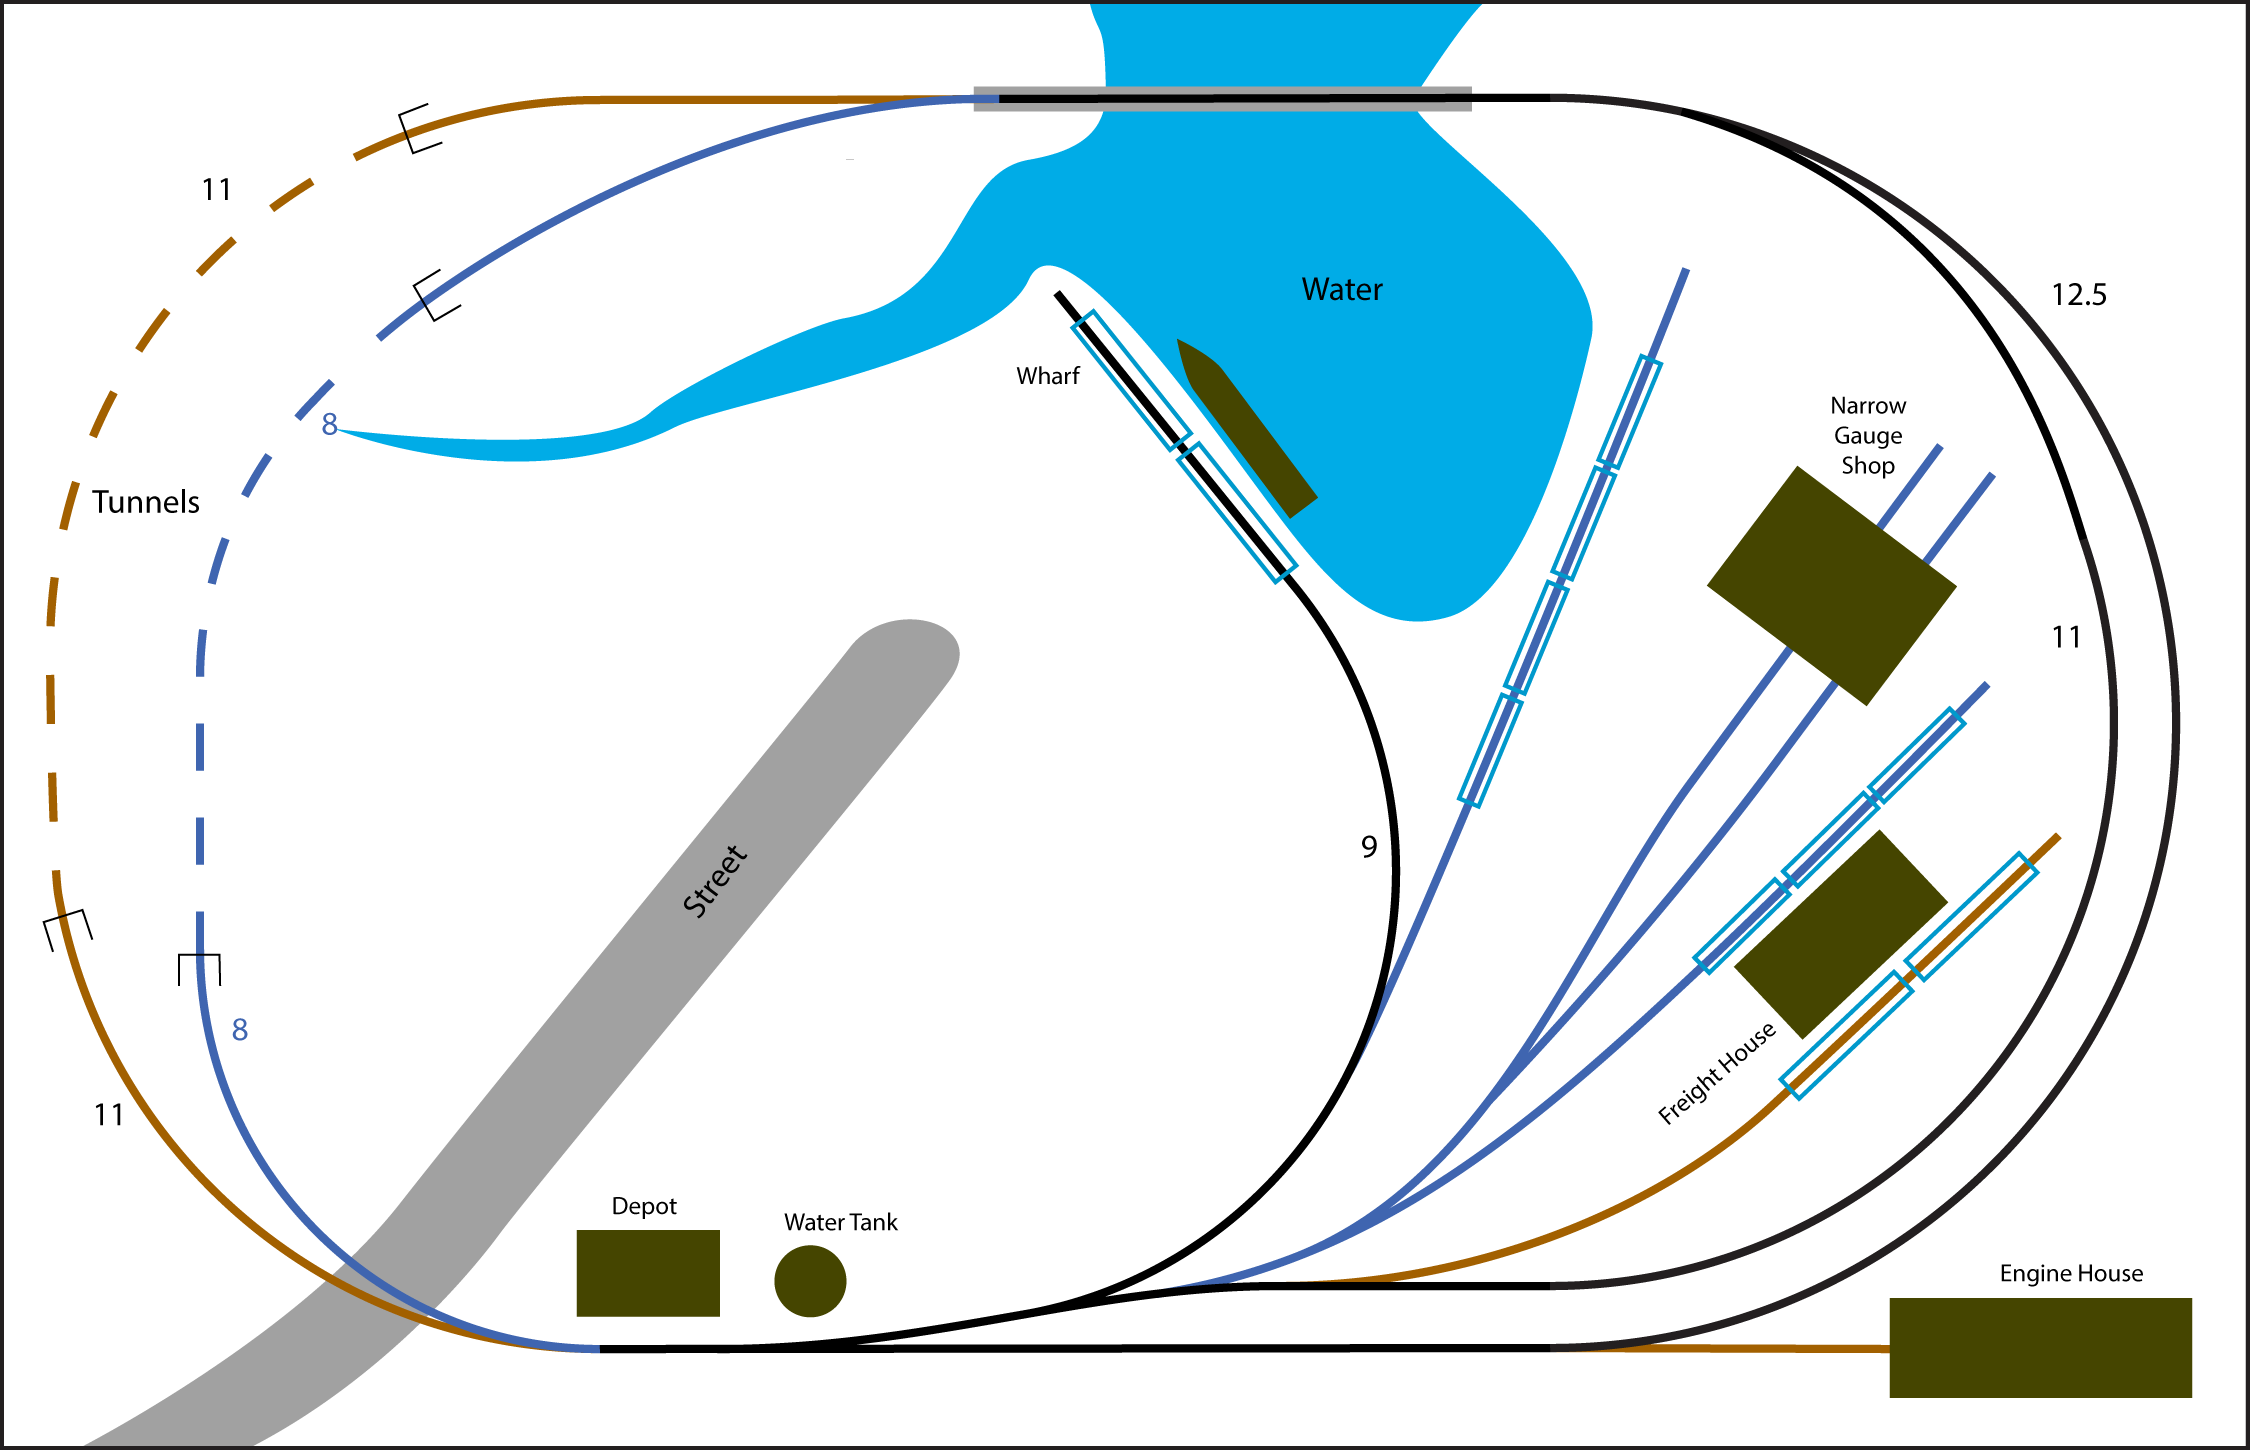
Plan No. 9
This plan is almost the same as plan 8, with one slight difference.
I originally planned to build the layout to the exact size of the RV’s dinette table. I want to be able to sit in the bench seats while running the trains. The tunnel side would normally go by the outside wall, with the passing track side toward the aisle.
Since our RV has a slide-out in the dinette area, I realized that I could make the layout a little longer without blocking the aisle. So this plan is 45 inches long instead of the original 42. The width is the same at 29 inches.
The trackage in the shop area is a little more relaxed as a result, though operationally there’s really no difference between this and plan 8. I think the more generous spacing between the turnouts in the shop area would make this plan slightly easier to build.
Plan No. 10
Plans 8 and 9 are both good, workable track plans. I think they could make nice model railroads.
Still, nothing is perfect. If I had to pick out a flaw, it’s that there is no switching lead for the shop and freight house tracks. Any train working the yard area will have to back onto the mainline frequently to switch cars.
Granted, these are supposed to be two small backwoods type railroads, not Union Pacific, so that situation might be okay.
Still, it was bugging me so I decided to try to work a switching lead into the plan somehow.
The idea with this plan was to reverse the freight house and car shop tracks so that the passing siding could double as a switching lead.
I couldn’t figure a way to make this work and still get tracks to the wharf, so I abandoned the effort.
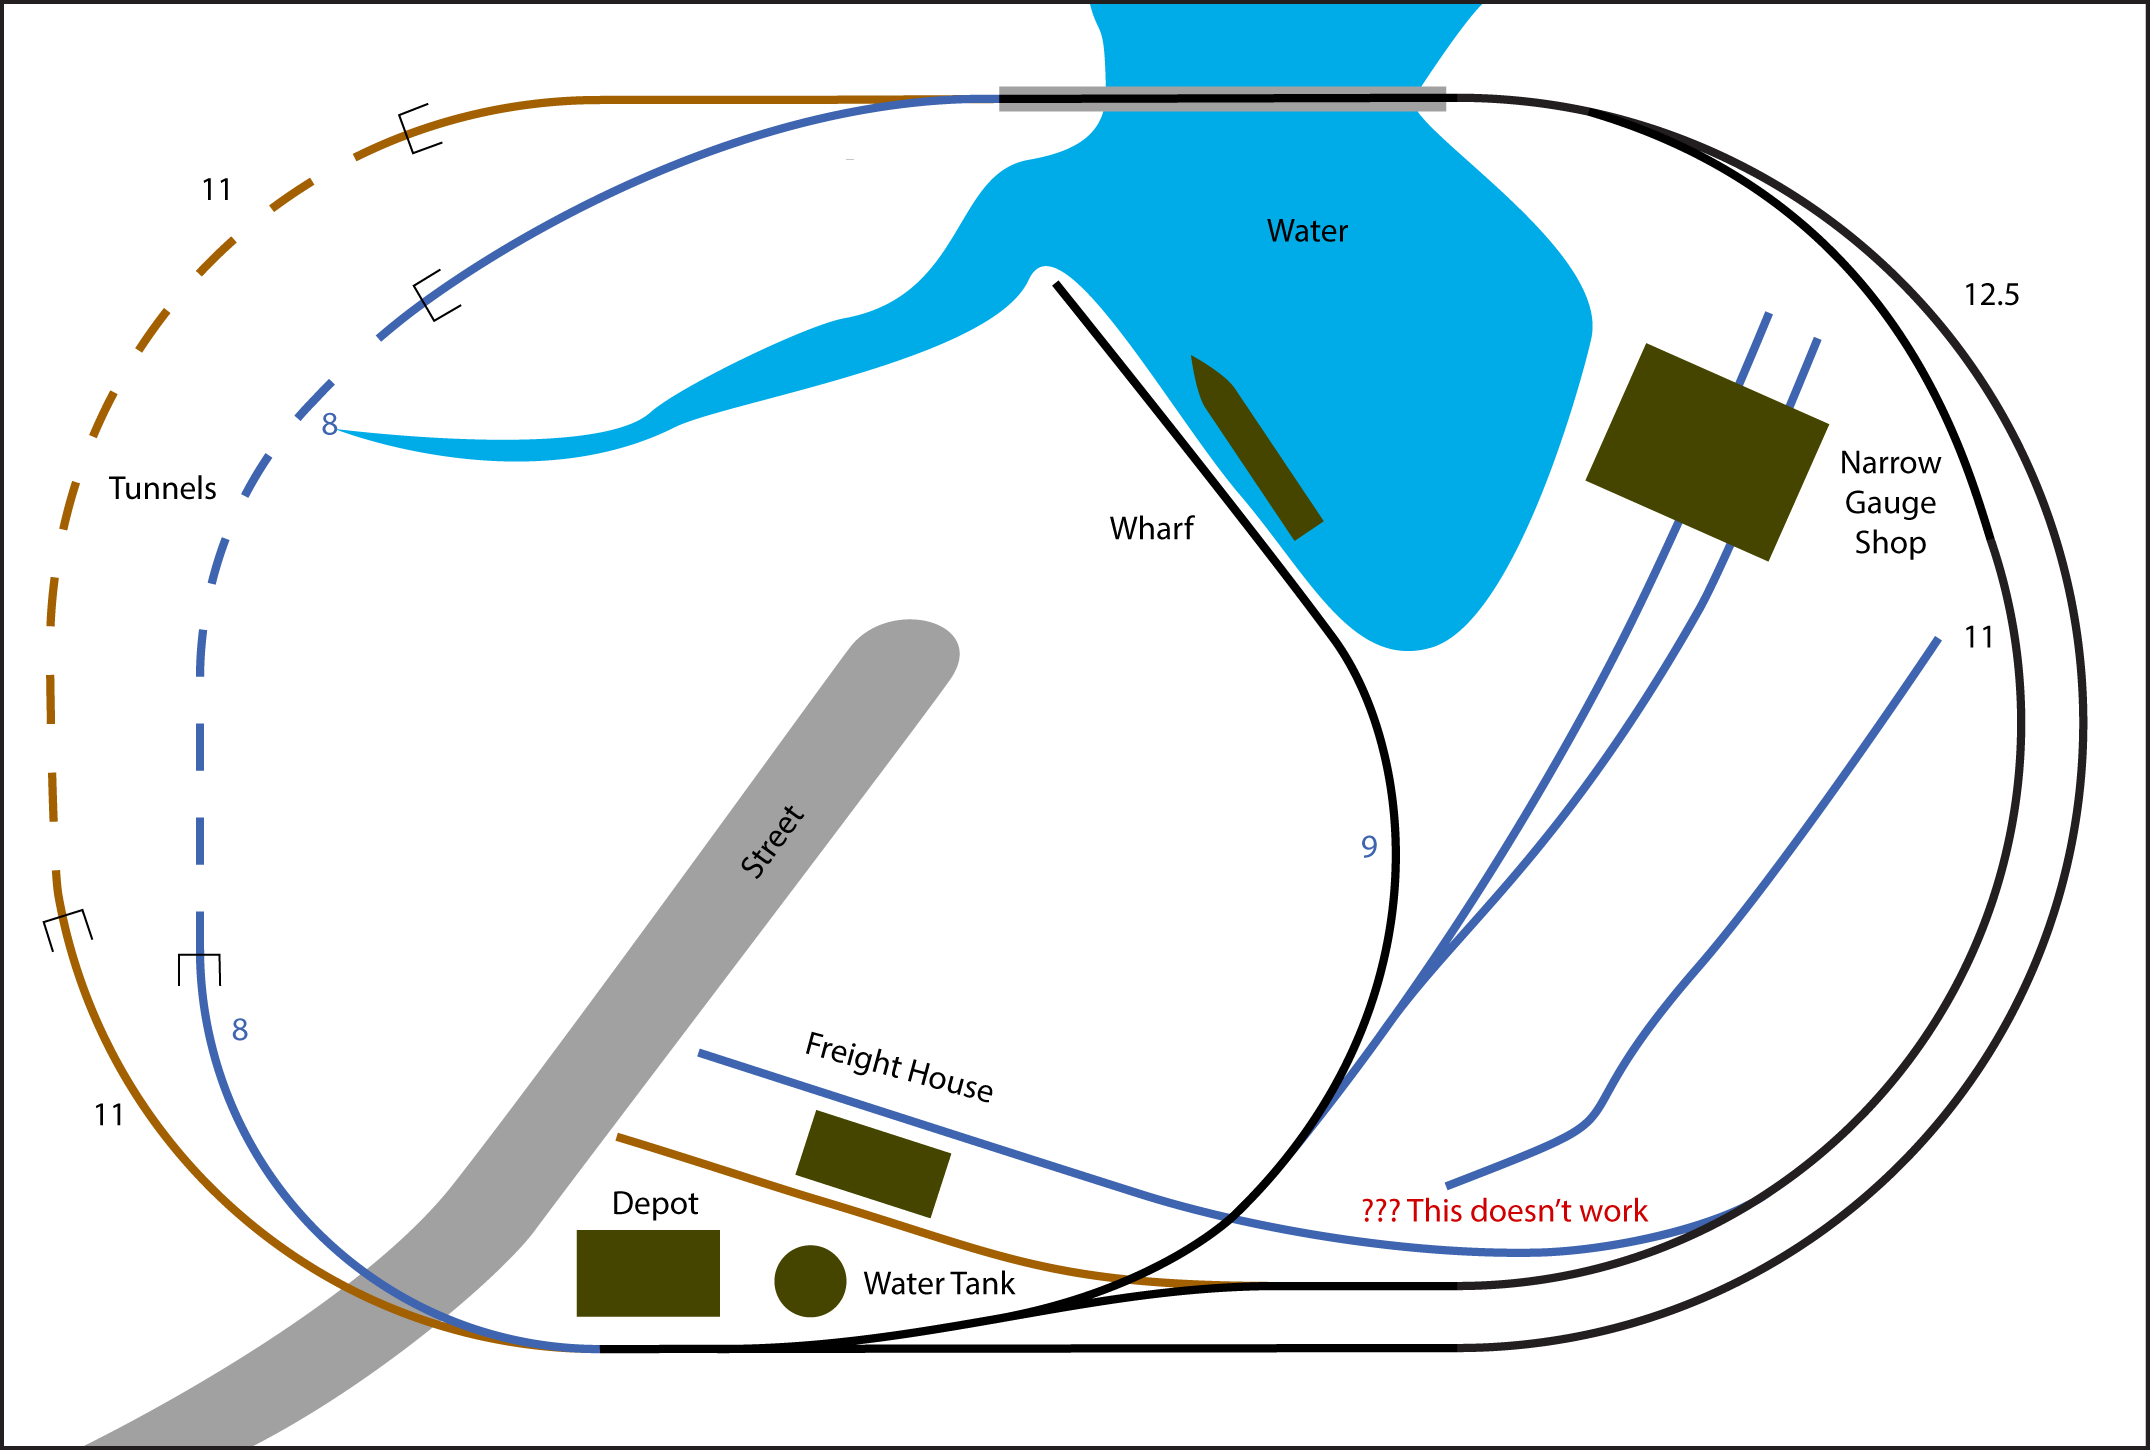
Plan No. 11
This is another interim design. For this plan I flipped the wharf track in the other direction. Now the wharf track can double as a switching lead for the yard area.
Unfortunately I couldn’t quite figure a way to get the one narrow gauge storage track to connect without crowding the turnouts too much.
Even though I don’t consider this plan successful, I liked the idea of using the curved part of the wharf track as a switch lead. The wharf spur also goes in the opposite direction of all the other tracks, so using the passing siding as a runaround will sometimes be necessary when switching the wharf.
It may not be obvious at first glance, but having a switching lead like this really increases the operating potential of the layout. The shop and freight house area can now be switched without venturing onto the mainline unless a runaround maneuver is required.
This means that another train could be running around on the mainline while you’re switching cars.
Plan No. 12
After carefully measuring the RV dinette table yet again with the slide-out extended, I realized that I could expand the layout length to 48 inches and still have a good aisle width. Any bigger would start to create problems.
An extra 3 inches might not seem like much, but in N scale it can make a huge difference. For this plan I put the wharf spur back the way it was, but added a separate switching lead. Having the bigger space made room to get the extra turnout for the switch lead in there.
Operationally this plan is nearly identical to plans 8 and 9, but with the switching lead added.
The switching lead, yard, and passing siding become a little mini layout-within-a-layout, that can be worked while a second train runs around the outside.
There are still some things I don’t like. The switching lead doesn’t really go anywhere, and it invades the town area a little. The harbor is tiny.
Still, this is a good, workable plan.
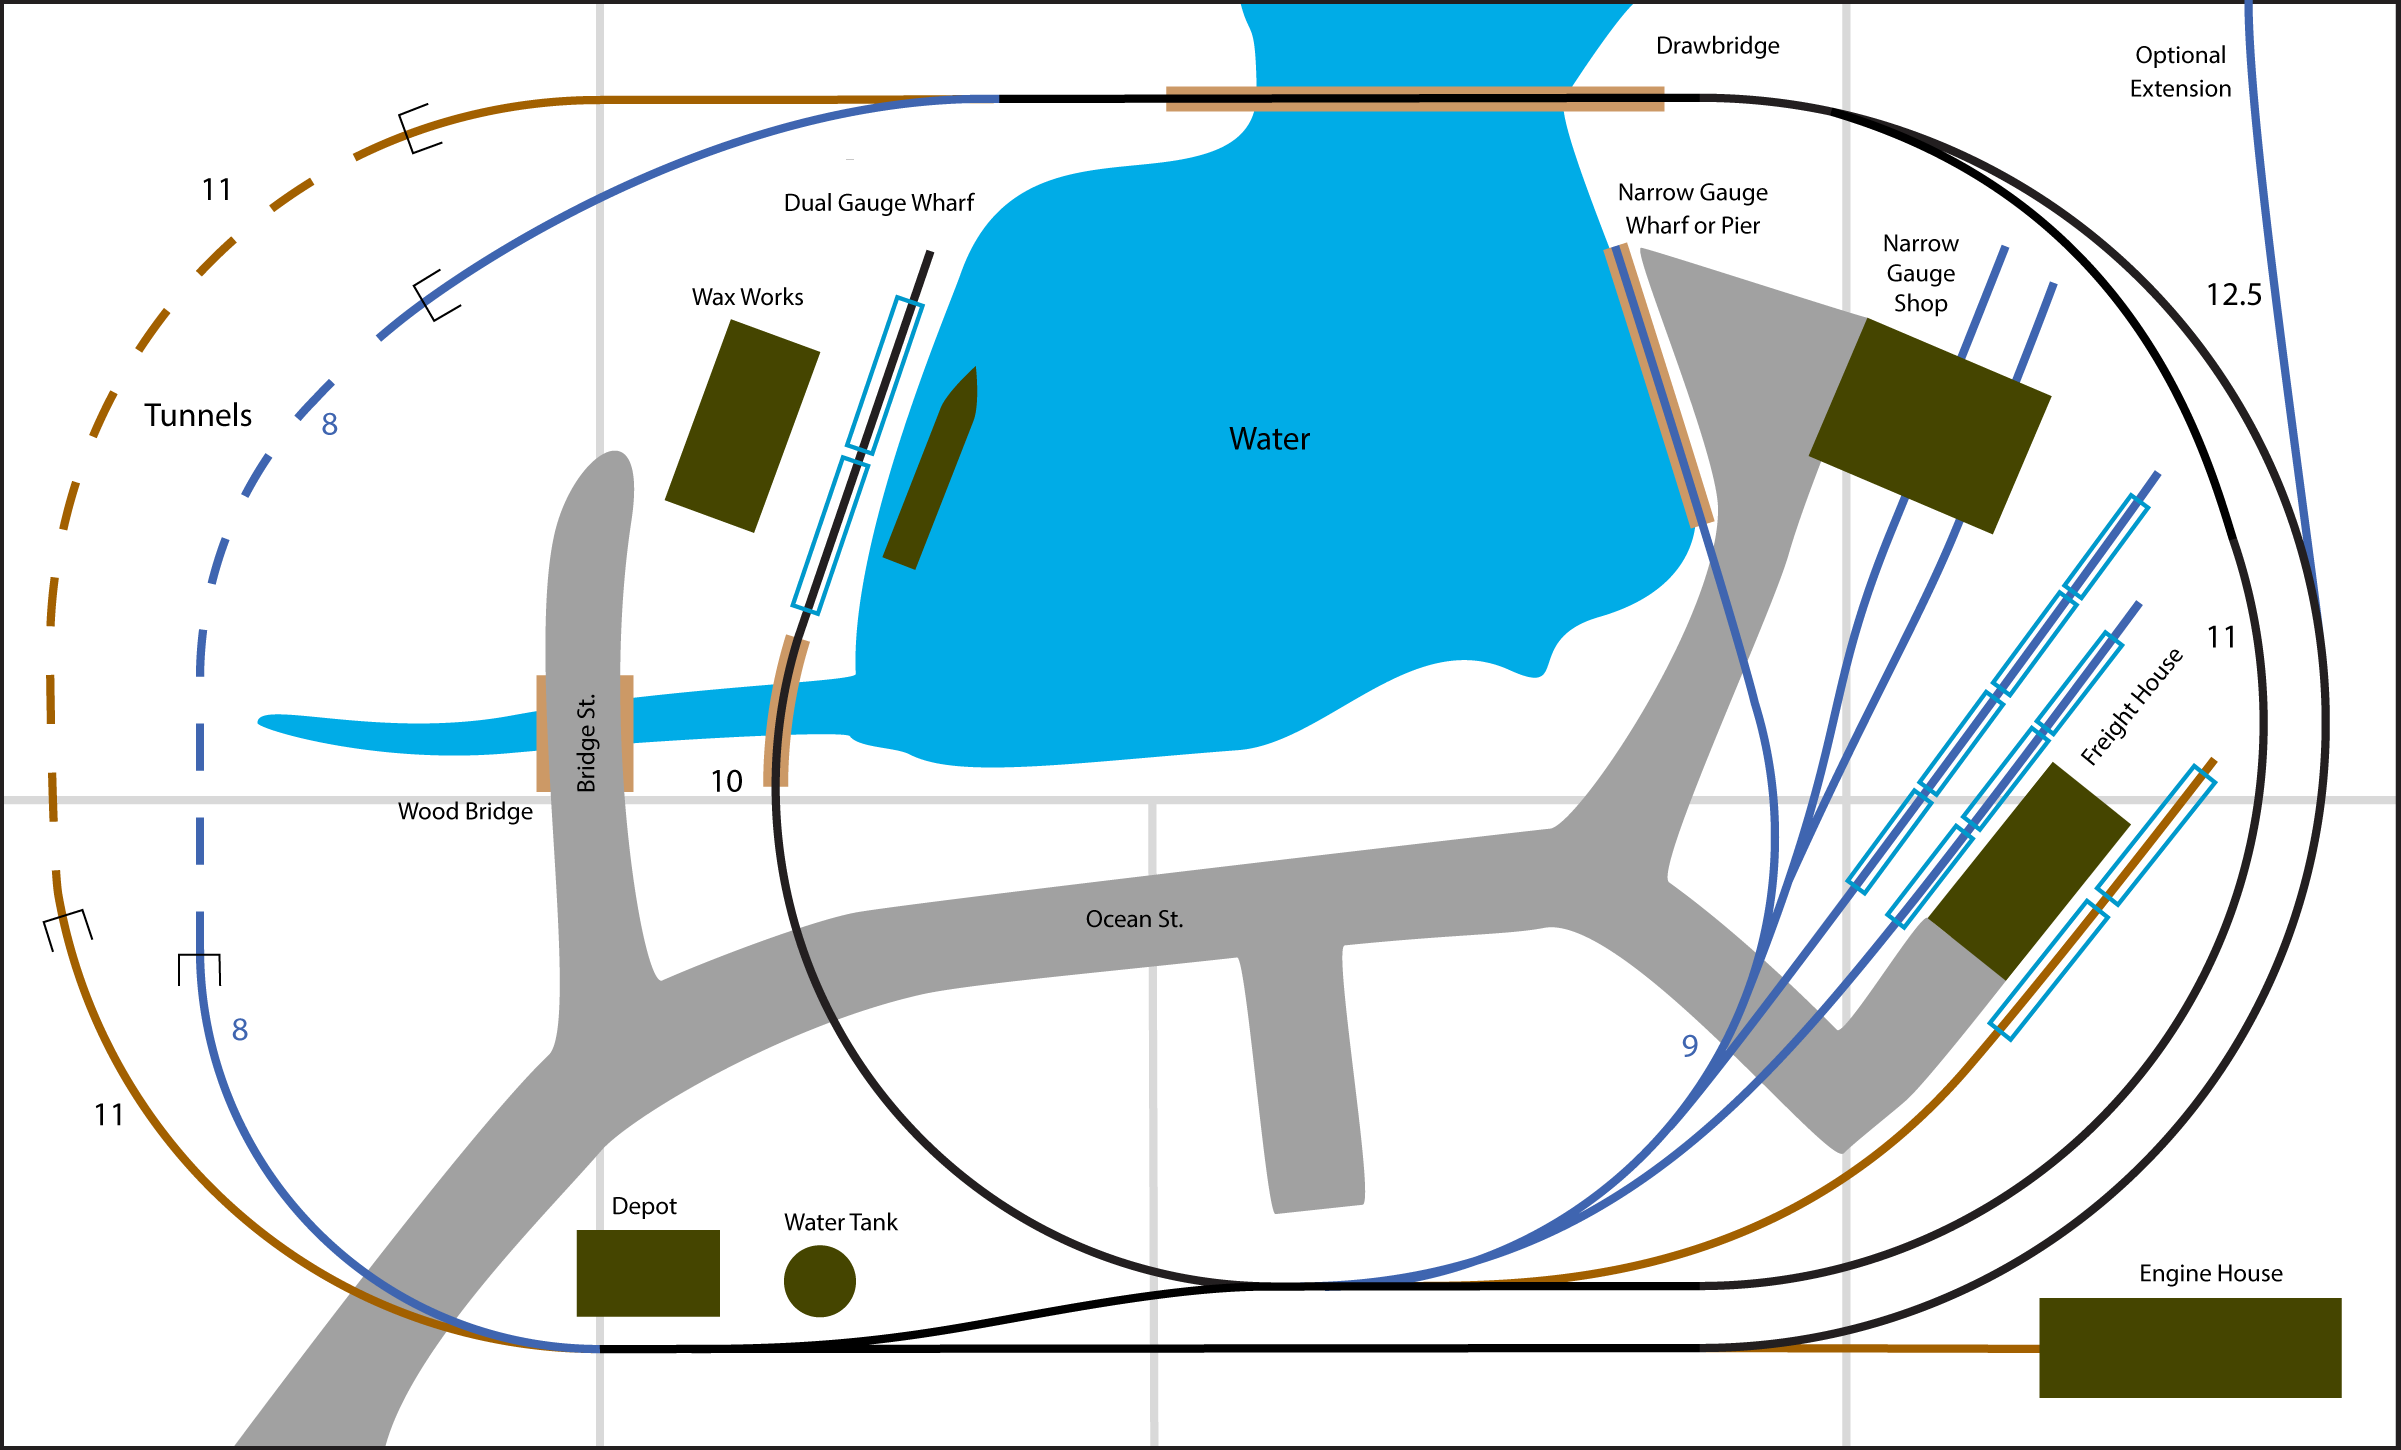
Plan No. 13
You might guess from all the additional detail on this plan that this is the one I ultimately settled on, and you’d be right.
The Nn3 narrow gauge is definitely the star in this plan, with the standard gauge playing an important secondary role.
This plan flips the dual gauge wharf spur / switching lead back around again. After drawing in some streets, I realized that this track wouldn’t detract from the “town on the left, trains on the right” concept too much.
The same person who donated the engine house also donated this really cool Wax Works kit, and I wanted to make sure to include it somewhere. I figured out the footprint of the structure from the kit instructions and parts and drew it to scale near the end of the dual gauge wharf spur.
I also made a street to go to it, which runs over the creek on a small wooden bridge that I scratch built years ago but never had a place for.
The dual gauge wharf spur is also now a 10 inch radius, so there should be no worries with standard gauge N scale locomotives running on it.
There is a second, narrow gauge wharf spur in the place of the one shown on some of the other plans. This track was a bit of an afterthought, but it gives yet another place to spot cars. Having this track be strictly narrow gauge also eliminates having to build as many dual-gauge turnouts in the yard area.
The narrow gauge storage track is now on the same side of the shop as the freight house, which looks more realistic to me.
The generous person who donated to the project also gave us a mine kit, which I couldn’t figure out how to work into the plan. I drew in an optional narrow gauge extension in the upper right corner. If something were built to connect to this, the new section would end up in the aisle way of the RV, so I’m not sure how practical it is. I’m still on the fence about actually building that track. I may just build the benchwork in such a way that I can add it later if I want to.
Construction
Speaking of benchwork, the light gray grid lines on this plan represent my benchwork plan. The layout will be built on a grid made of dimensional lumber and a plywood top that will have cut outs in areas where the scenery dips below track level (like the harbor).
It’s important not to place any of the wood grid segments directly below a turnout, as that can make installing switch machines and throw mechanisms more complicated.
Vertical terrain like the hill on the left side will be built up with layers of foam. Even though the tunnels are short, I will have to work in some kind of access to make it easier to fish cars out if there’s a derailment.
My wife, Nichole, had a great idea to build handhold cutouts into the fascia, to make it easier to grab and lift the layout.
The benchwork below the track needs to be deep enough to contain switch machines and all the wiring for the layout. Since it’s going to be put on a tabletop, I don’t want anything dangling down underneath.
Operation
With the dual gauge wharf spur, narrow gauge trains have six tracks where cars can be spotted. That should be more than enough to make for some interesting operation.
Standard gauge trains can switch both the dual gauge wharf spur and the standard gauge freight house track. A locomotive can be parked in the engine house.
Operationally, I envision a short three or four car train will be staged inside one of the tunnels. It will come into town, pick up and set out cars as needed, and then either continue on in the same direction or go back the way it came.
I didn’t have room and didn’t want the complication of a turntable, so locomotives will have to run in reverse if they change direction in town.
As I discussed before, a second train could be running around on the outside while the first train is working the yard.
The narrow gauge storage track and the shop tracks could be used as active tracks or as places to park additional locomotives or maintenance-of-way equipment.
The drawbridge model I bought actually works, and that can provide more operational interest on the mainline. I bought a pair of searchlight signal kits, one for each end of the bridge, that I want to wire up so that they’re green when the bridge is down and red when it’s up.
Another scenario would be to have one standard gauge and one narrow gauge train staged in each tunnel, then have them come into town for a meet. One takes the siding while the other passes. In fact, with more than one operator, that could be done while someone was working the yard.
I think there’s enough operating potential in this plan to keep it interesting.
Control
I definitely had DCC in mind when I designed this layout. Using DCC should keep the wiring fairly simple, even with the complicated dual-gauge trackwork. In fact, I think using DC on a layout like this would require very careful planning.
If someone wanted to use DC, one possibility would be to use a common rail scheme where the shared rail of the dual gauge track is the common. Having separate DC circuits for the narrow and standard gauge with two power packs would still allow two trains to operate independently without any block toggles. This would require very careful construction, though, to make sure wheels could not cause shorts between the narrow gauge and standard gauge circuits.
With DCC, the entire layout could be one big circuit. If a wheel touched the standard and narrow gauge rails of the dual-gauge track at the same time it wouldn’t matter since these would be tied together anyway. The layout is small enough that power districts shouldn’t be necessary. If you wanted to independently control more than one train, you could just add a throttle.
I intend to put at least two plug-in throttle connections on the layout fascia. This layout is small enough that I don’t think wireless throttles are necessary.
Powered turnout frogs are going to be a necessity to prevent stalling with all the short wheelbase steam locomotives that I intend to run on this layout.
Accessories
One of the advantages to building a small layout like this is that you can really pay attention to detail. I want all of the structures to be lit, so there will need to be some lighting circuits built into the layout.
The drawbridge will need some kind of lift mechanism, and some kind of switch to change the signals as appropriate.
I have a bunch of slow motion switch machines in storage, so I may use those for the turnouts.
Scenery
As I mentioned earlier, I have a number of N scale structure kits that I hope to use on this layout. I also have vehicles and people, and a lot of scenic details.
Even though the layout is small, I see the potential for a lot of micro-scenes that will draw someone’s eye and will make for interesting photography. There is room along the layout’s Ocean St., for example, to have a row of structures that back onto the harbor. The backs of these buildings could have little boat slips or life rafts or any number of things that would make them interesting to look at from that angle.
The hill above the tunnels could be covered in grass with oak trees, typical of many places in California. The creek could come down from the hill in a series of small waterfalls.
Some weathered work equipment or vehicles parked on or off the rails near the car shop would give the area the feel of a hard-working, prosperous but not too prosperous railroad line.
Conclusion
So that’s the design. Now I just have to start building it!